How do you start an ecommerce store using EKM?
That is exactly what I am going to show you in this tutorial, where we go from signing up to getting your store ready to go live!
I will also show you what I think is the most logical and efficient way to set up your store.
Disclosure: Our site is reader supported, meaning we may earn a commission from purchases made through our links, to learn more, please see our Affiliate Disclosure.
Step 1: Sign Up to EKM
So the first step with EKM is to sign up to the platform and as standard, EKM offer a 14 day trail but if you click through on any of the EKM links in this post, you will get an exclusive 28 Day Free Trial.
To get get started with EKM, just click on the green, Get Started button in the top right hand corner of the EKM homepage and the following page will appear (if you haven’t gone through any of the links on this page will say 14 instead of 28). All you need to do on this page is enter your email address and create a password.

On the next page, you will be asked which plan you want to start with, the most popular option is the Standard plan but for new ecommerce businesses, the Basic plan will be just fine. You can always upgrade your plan at a later date.

Simply click on whichever plan you want to get started with and it will take you through to the following screen, which is where you need to enter your payment details. This is something that EKM does that no other platforms do but you won’t be charged until your free trial has expired or you decide to upgrade your trial to a live plan.
There are two payment options, you can either set it up to pay via your credit or debit card or you can choose to pay via PayPal. If you choose to pay via your credit or debit card, you will be asked to enter those details or if you choose PayPal, a pop-up window will appear asking you to sign into PayPal and confirm your payment method.

Once you have done this, a message will appear letting you know that your trial has begun and providing you with a button to allow you to login to your store and clicking this button will start the EKM set up wizard, which will ask you a couple of questions to help your store get started properly.
The first question asks you what stage your business is currently at and this helps EKM know how they can tailor their platform and support to help you get the best out of EKM.

The second question asks you what niche your business is in, which once again helps them understand more about your business but they will also install a theme that is suitable for your niche (but you can change it if you want).

Once you have chosen your niche, you will then be taken through to your admin dashboard, which we will look at more in step 2.
Step 2: EKM Admin Dashboard
Now that the sing up process is complete, you can now access your admin dashboard, which looks like the image below:
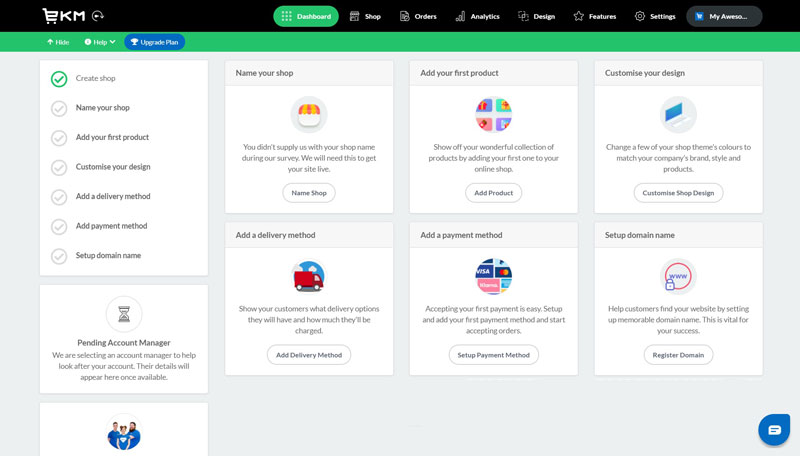
On your first sign in, you will be greeted by a short, 6 step set up guide, which includes:
- Naming your shop
- Adding your first product
- Customise the design
- Add a delivery method
- Add a payment method
- Setup domain name
This is a pretty good set up guide but in this tutorial, we will be looking at all of these steps in more detail to help you get started properly with EKM.
Outside of the set up guide, the Dashboard section is basically the homepage of your admin area and once all the set up steps are completed, you will have a summary of your stores performance along with notifications of any updates to the EKM system.
There are also options to contact your account manager (if applicable on your plan) and also the contact number for support and your support pin.
Unlike many platforms, EKM have opted for a top navigation menu, rather than a side navigation one and have 7 main sections, which are:
- Dashboard
- Shop
- Orders
- Analytics
- Design
- Features
- Settings
All of these are pretty straight forward except for the Shop page, which is a combination of a live editor and also where you can add and manage your products and categories.
Step 3: Store Settings
Before adding products or anything else, you want to go through and configure your stores settings and all of these can be found under the settings tab (surprisingly!).
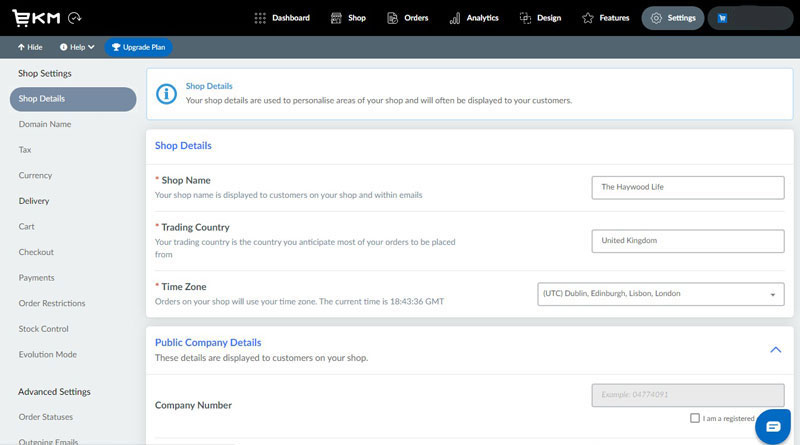
The first section is your Shop Details and this includes:
- Shop Name
- Trading Country
- Time Zone
- Company Number (if a Limited Company)
- Company Name
- VAT Number (if VAT Registered)
- Company Address
- Company Email Address
- Company Phone Number
All of these bar the Company Number and VAT Number are required before you can take your store live.
You will also want to go into the Tax settings and select whether or not you charge tax on your products.
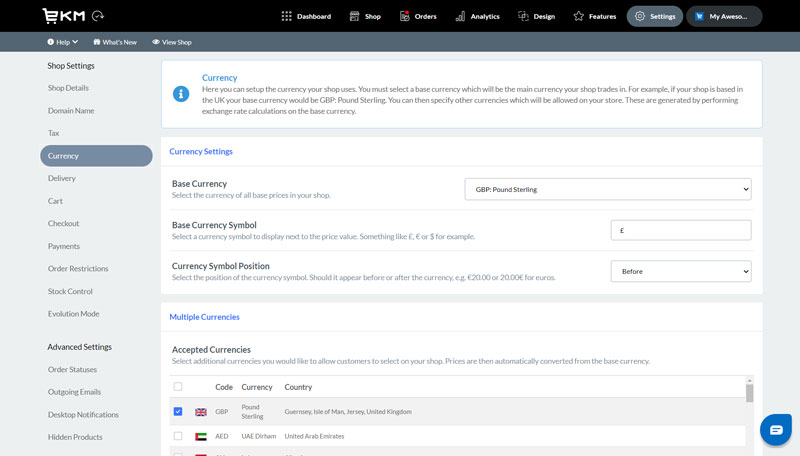
Next up, you will want to check on your Currency settings to make sure you are listing your products in the correct currency, you can also select additional currencies that you accept on your store, which is useful if you are selling internationally.
The final section of the Store settings I would look at (I’ll cover Payment Gateways and Delivery Methods separately below) is the Order Restrictions options as you can use this to create rules for your store, including:
- Minimum/Maximum Order Amount
- Minimum/Maximum Amount of Products that can be ordered
- Maximum amount of characters in the text area for custom products
- Select which Countries you accept orders from
Most stores won’t probably need to apply minimums and maximum restrictions but the country option is one I would recommend setting up as it can help to reduce fraudulent orders and it can reduce hassle as there is no point accepting orders from Australia if you only sell to the UK.
Step 4: Set up Payment Gateways
The next step is to set up how you are going to get paid (unless you are giving everything away for free!). This can be done by going to Settings → Payment Methods and you will see the following screen:

EKM offers a good selection of payment gateways, including:
- PayPal
- Stripe
- LayBuy
- Amazon Pay
- WorldPay
- SagePay
- Barclaycard EPDQ
- First Data
Whichever method you choose, EKM will provide all the instructions on how to set these payment gateways and the documentation is very good. For most new EKM stores, PayPal and Stripe will probably be the best options and you will need to set up accounts with these companies before you can integrate them with EKM.
EKM also offer a choice of manual payment options, including:
- Payment on Delivery
- Purchase Orders
- Cheques
Step 5: Set up Shipping Methods
The final settings you want to set up before you start adding your inventory is to create shipping methods for your products.

To help you out, EKM have created some delivery templates to help you get started or you can select custom and create your own delivery methods. There are quite a few options to work through on this page, so lets go through all of them.
First off is the main settings for the delivery method and this includes:
- Enable Delivery Methods (checkbox)
- Enable for All Products (checkbox)
- Country, which countries do you want this method to apply to
- Name, what is the name of the delivery method
- Display Name, only enter this if you want it to display differently to the name you entered above for your customers
- Description, enter a description for this method, can also include specific instructions here
- Price, how much this method costs, for Free Delivery, leave at 0.00
- Tax Rate, is tax charged on this delivery method?
- Delivery Notes, info that is displayed to customers after they have placed their order
There are also more specific settings that you can implement for your delivery methods, such as:
- Delivery Slots, this allows you to create timed delivery slots, which your customers can select when they are going through the checkout process
- Location Restrictions, if you offer a local delivery method, you can set that up using these settings and set the radius from your location that you deliver to
- Price Restrictions, set minimum and maximum order values for delivery methods
- Weight Restrictions, similar to the price restrictions as you can set minimum and maximum weights for your delivery method
Step 6: Products and Inventory
Once you have got all of your stores settings set up, it is time to start adding your product inventory and for this, I am going to look at three main steps:
- Adding a New Product
- Creating a Category
- Managing your Inventory
Adding a New Product in EKM
To add a new product, you want to navigate to the Shop section of the admin dashboard and click on +Add Product button and the following pop up will appear.

Within this pop up is 9 different sections to add a new product, including:
- Basic Details, this is where you add the:
- Name
- Description
- Price
- Cost Price
- Variations, if the product has different colours and/or sizes for example, this is the section to add those
- Images & Videos, add your product images, you can also choose to upload videos if you want to
- Attributes, create attributes such as product code or weight but you will need to install the Product Attributes feature
- Options, allow customers to add customisations to their product via:
- Drop down list
- Text box
- Text area
- Image (for printable products etc)
- Delivery Charges, select which delivery option you want to use for that product
- Category Management, choose which category that product belongs in
- Order Notes, add message that will be sent to your customer on their order confirmation email
- Duplicate Product, create a copy of this product
You can then choose to save and close the page, which closes the pop up or you can save it and carry on working on it (it is recommended to save every so often).
Creating a Category
The next step is to set up the categories for your products to go into as this creates a hierarchy for your products and makes it easier for your sites visitors to navigate around your site.

Adding a new category is a very similar process to that of adding a new product, the only real difference is that there are fewer options in the sidebar, which are:
- Basic Details, the name of the category and a description
- Image & Photos, add an image to your category
- Category Management, if you want to create a sub-category, then you will do it in here
- Product Filters, choose which attributes the category can be filtered by
Assigning products to categories needs to be done on the product creation/editing screen, so an argument can be made that creating your categories before your products can make the workflow easier.
Your master categories are automatically added to your main navigation menu in EKM, so you do want to be mindful as to how easy these are going to be to navigate for your customers. When creating sub categories make sure you set the master category correctly.
If you set the master category to Home, then it will display in the main navigation menu, where as if you set the master category to one you created, it will appear in a drop down menu.
Managing Your Inventory
Managing your inventory as standard isn’t great in EKM as you need to navigate through the live editor in the Shop section of the dashboard to find the product, click edit content and then edit the product. This isn’t a great way to manage your inventory, especially if you have a large number of products.
Fortunately, EKM have included a feature called the Advanced Inventory Manager that can be installed and this makes the whole process considerably easier!
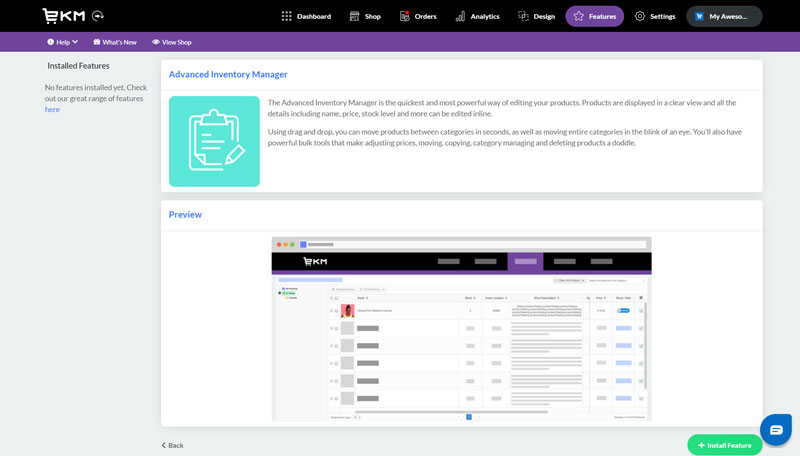
This is because the Advanced Inventory Manager is basically a bulk editor but it also includes the options to create new products and categories, meaning that you can manage all of your inventory from the feature.

In the Advanced Inventory Manager, you can:
- Access the pop up to edit your products
- Change the name of categories
- Change the name of the product
- Change the product code
- Update stock quantity
- Change the brand
- Change the condition
- Change the short description
- Update the price
- Toggle whether to product is visible on the front end of your site or not
Being able to manage all of your stock from one place does make it a near essential feature that you want to add to your EKM store.
Step 7: Create Business Pages
This is possibly the most boring thing to do when setting up an EKM store but it is hugely important as business pages are a legal requirement for websites, especially here in the UK.
To set up your business pages, go to Design → Webpages and you will see that EKM has already created some templates for you, including:
- About Us
- Contact Us
- Terms and Conditions
- Privacy Policy

You will also notice that the Terms and Conditions and Privacy Policy can’t be deactivated, redirected or deleted, this is because these two are legal requirements. To help you out, the team at EKM have created templates for both of these pages, which can be edited to fit your business.
But it is YOUR responsibility as the website owner/operator to make sure that both of these policies are legal and comply with all relevant rules and regulations.
The Contact Us page also has a template including a contact form, your email address and phone number and honestly, I would leave this as it is.
You can also create your own pages and you may want to add pages for your:
- Payment Policy
- Returns Policy
- Delivery Details
These can just be helpful to give your customers as much information as possible and these webpages are automatically added to the information section in the footer.
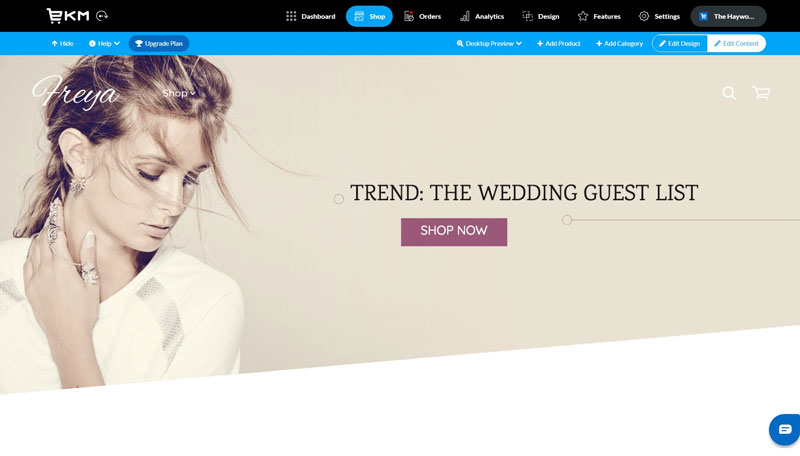
Step 8: Theme Selection & Customisation
Now it is time to start working on the front end of your site and this isn’t completely straightforward in EKM as the design elements are split over two sections and to try and make this as clear as possible, I’m going to cover these two sections separately.
Design Section

In the main design section, you will see that pages of your site that you can customise, which are the:
- Homepage
- Product Page, allows you to edit the Add to Cart Button
- Category Page (theme dependant)
- Checkout, edit the checkout logo and change the colours
Most of the customisation options are based around the homepage and all of these options can be accessed from the Edit button. This will also bring up the option to change your theme, which is very easy to do as you just browse through EKM’s themes, click on one you like and the click the Apply to Your Shop button and it will change it for you.
Another option in the Edit section is to change the layout of your pages and clicking on this will bring up and editor.
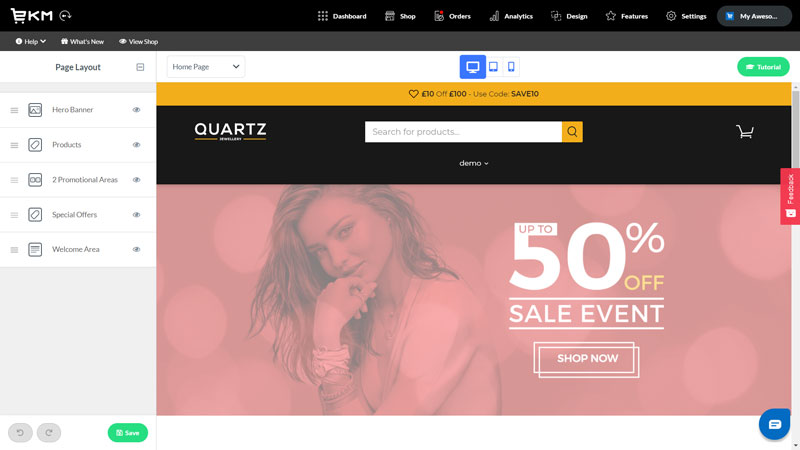
In here you can drag and drop the existing sections of the page, so that they appear differently on the front end of your site, there are also layout options for the Product and Category pages. Unfortunately though, there aren’t any additional sections available to add to your pages.
Other options in the Edit menu include:
- Edit Logo, delete, design or upload another logo
- Change Colours, change the colours for different elements on your site
- Inject Custom Code, add custom CSS styling code or add HTML code to your header
- Reset Design Elements, undo changes
- Use Default Colours, revert back to default colours
- Theme Preview
Shop Section
If you want to change your stores images or copy, then you need to go into the Shop section of the dashboard and click Edit Content, this will bring up an edit button under every section of your site that you can change.
If you click on the Edit Content option, then it will add an option to edit your products or categories that you have added to your store but using the Advanced Inventory Manager is a quicker way of doing this.
Step 9: Add Domain Name
The final step of getting your EKM store ready to go live is to set it up on your businesses domain name, now these can be purchased directly from EKM but I always recommend keeping your domain name provider and your website platform separate as it gives you more control over your website.
To set up your domain name, go to Settings → Domain and there will be two main options for you:
- Register a New Domain via EKM (not available while on the free trial)
- Connect an Existing Domain that you own
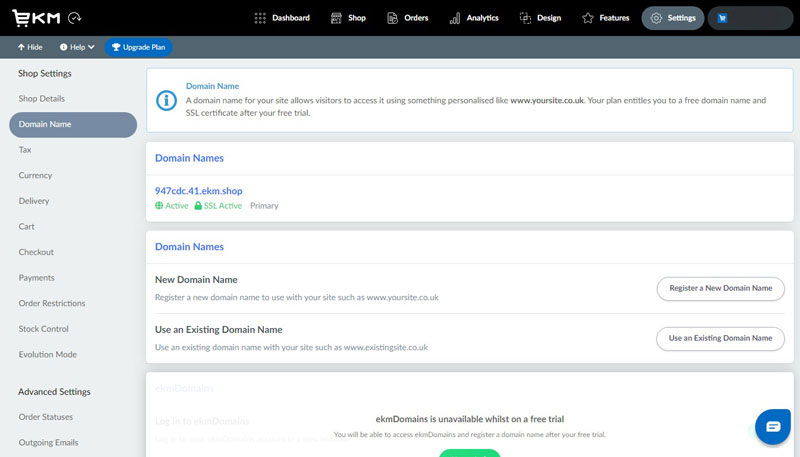
If you are using a new domain via EKM, you will be taken through the process of acquiring the domain name and setting up your site so that it works on this new domain.
If you are connecting an existing domain, you will be asked whether you want to set your shop up on the main domain or on a sub-domain, either way you will be given the instructions on how to do this, which involves creating an ‘A Record’ to point the domain towards the EKM servers.
Step 10: Testing and Going Live
At this point, your EKM is pretty much good to go. Obviously, there are things you may want to set up such as features or integrations but the main parts of your site are all set up.
But before you go live and start marketing your site, I would highly recommend testing your site out first to:
- Make sure that everything is working
- You know how to use EKM to manage your orders etc
To do this, you are going to have to run some test orders through your site and to do this, you want to open a private tab in your browser and then go to your store. Place an order in the exact same way a customer would, so that you understand the process from a customers perspective but also understand what happens in the admin dashboard.
Then go through the process of printing off orders, updating order statuses and then refunding and cancelling the order. This was you will understand how to do the process properly and won’t be using actual customers as guinea pigs.
You also want to check that emails are being sent out correctly, checking your contact form is also worthwhile. Basically test out anything that your customer can do on your site.
Once you are happy that everything is working properly and you know how to do everything you need to do, it is time to start getting the customers in. There is no setting you need to change to make your site live, unless you have installed the Password Protect feature to stop people from accessing your site before it goes live.
Conclusion
I hope this tutorial has been helpful and given you some tips and guidance on how to set up your EKM store and I tried to write it in a way that I would have found helpful (if that makes sense?).
Obviously, this is a basic tutorial to help take you through the main steps of getting an EKM store set up and there many different things you can do when you start installing different features etc but those are very much store specific and this has been designed to help everyone just getting started with EKM.

Hi, I'm Paul, the Owner and Founder of EcommerceGold.
I ran my own Ecommerce Business for over 7 years and now help others start their own online retail empires!