If you are selling physical products on Shopify, then you need to set up your shipping methods so that a) Your customers know what options you offer and b) You are charging the right amount for your shipping.
There are also a few different shipping options that you can set up and we are going to cover each of these in this tutorial so that you have set up your Shopify stores shipping properly.
Setting Up Shipping Rates
To access your shipping settings, go to Settings → Shipping and Delivery and it will show all of the options for shipping, similar to the image below:
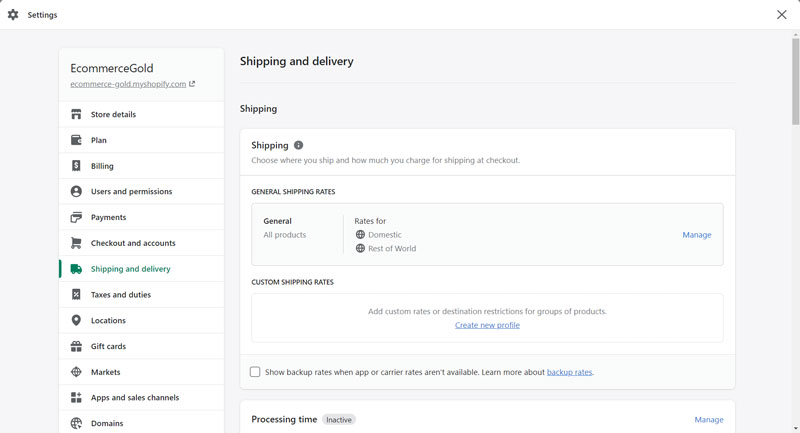
By default, Shopify creates general shipping rates, which you can either choose to manage (edit) or create your own custom profile.
The default General profile that Shopify creates cannot be deleted and new products are automatically added to this profile, so if the majority of your products are going to be using the same shipping information, then it is best to manage (edit) the General profile.
When you click manage, you will be taken through to a new page with all the options for the general profile and the first box is the products that this profile applies to but there are no options here to manually remove the products, this can only be done by creating a custom shipping profile and adding the products to the new profile.
The second box on the page is where you can configure all of the settings for the general profile and will show options similar to the image below:

The default settings that Shopify creates are based on the location information you entered when you set up your store and will include the location where you are shipping from, a domestic shipping option and one for the rest of the world.
If you want to remove all of the default shipping options, you can do so by clicking manage next to the Shipping from location, which brings up the following pop-up and clicking done will remove all of the default rates.
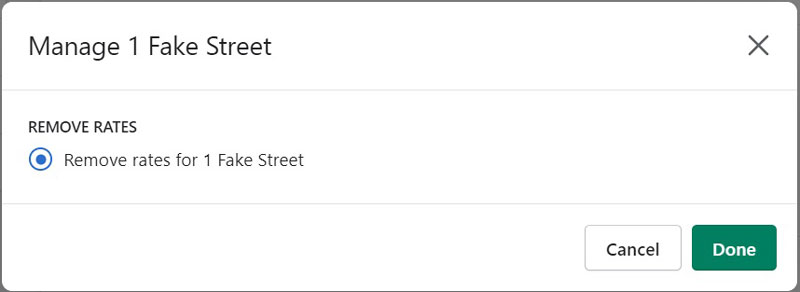
But if you want to edit or remove the default shipping options, you can do by clicking the three dots next to each shipping option. Below we will go into shipping zones and shipping rates in more detail.
Shopify Shipping Zones
What are Shipping Zones? Shipping zones are areas in the world where you can choose to ship your products and Shopify offer a few different options:
- Rest of the World – if you have set up a domestic shipping rate and want a standard rate for every other country in the world
- Continents – if you want to set a rate for a continent such as Asia, Africa, Europe or North America
- Countries – if you want to set a rate for a specific country
- Some countries also have options for specific counties or provinces, which can be accessed by clicking the arrow next to the country and these will be shown in an expanding menu
You can select multiple continents, countries and provinces within a single shipping zone, which is ideal if you are charging the same shipping to multiple areas.
However, in most cases, you will want to create separate shipping zones for different areas of the world that you ship to due to costs varying so much between different countries.

Shopify Shipping Rates
Once you have set up your shipping zone/s, you can then set a shipping rate for that zone and you can choose to edit the existing shipping rate or add a new one.
If you are using a carrier or app to calculate shipping rates for you, then you will need to add a new shipping rate as the option isn’t available on the edit screen.
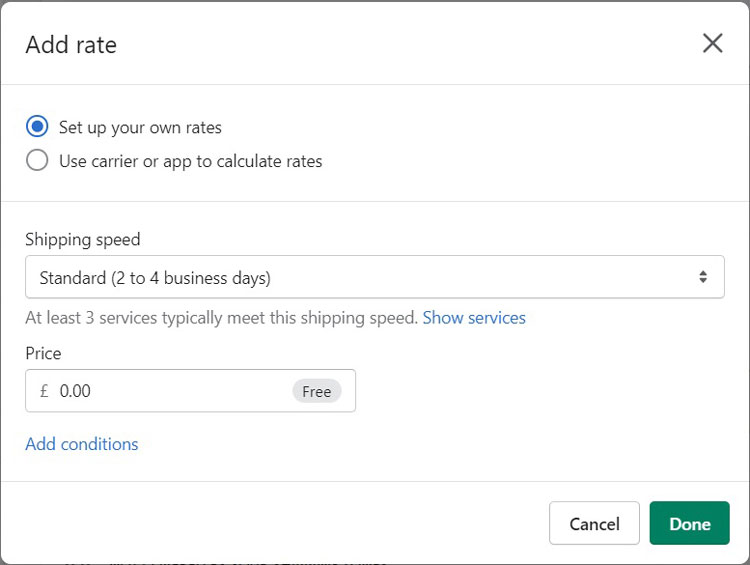
If you choose to set up your own rates, then you can edit the default option but either way, you will have some options to enter, which include:
- Shipping Speed – how long it should take for the item to reach the customer (Shopify also shows you local services that match these requirements)
- Price – how much this method will cost
- Conditions – these are optional but allow you to set shipping rates based on the value of the order or the weight of the order, with minimum and maximum options available for both
Once you have entered all of the options, click done and it will add the shipping rates to that zone and once you are happy with all of the information regarding zones and rates, simply click save and the profile will be updated on the front end of your store.
Creating a New Shipping Profile
If you have products that require different shipping options, then you can create a custom shipping profile and this can be done by clicking on the Create new profile link and it will take you to a new page with the following options:
- Add a name for the Profile
- Choose which products the profile will apply to
- Select the address you are shipping from
- Create a zone you are shipping to

After you have set a name and chosen the products for the profile, the process of adding a shipping zone and creating the rates for these zones are exactly the same as what we covered above.
Other Shipping Options
There are two other options that are available for Shipping and they are:
- Show backup rates when carrier or app rates aren’t available – if your carrier or app stops showing rates for some reason, you can show backup rates but unfortunately, these are set by Shopify and can’t be edited, so check out the rates before enabling this option
- Processing Time – you can choose to add a processing time to your checkout, which is the time it takes for your business to fulfill the order and this will be used in conjunction with the shipping speed to show your customers an estimated delivery day in the checkout

How to Set up Local Delivery in Shopify
For some Shopify stores, they may only deliver to their local area, in which case you want to set up the local delivery options and these are found under the Shipping options in the Shopify setting.
To enable local delivery on your store, click on the location from which your local deliveries are going to be going from and it will take you through to the setup screen, from here you want to check the box ‘This location offers local delivery.

This will open up all of the options for setting up your local delivery and you can also select which currency the delivery prices are charged in from this location.
The first set of options are to set up the delivery area and you can set this based on postal codes or you can set a delivery radius around your location and this can be set to kilometers (km) or miles (mi).

Once you have set up the parameters for the local delivery, you can then set the information, including:
- Zone name
- Zone Radius or Postcodes depending on which option was selected above
- Minimum order prices
- Delivery price
- Delivery information, which appears in the checkout and order confirmation notification
You can also add conditional pricing, which allows you to set delivery pricing based on the order value, for example:
If the order price was between 0 and 99, you could set the delivery charge at 10 but for orders of 100+, you could set the delivery charge at 5, which gives customers an incentive to order a bit more!
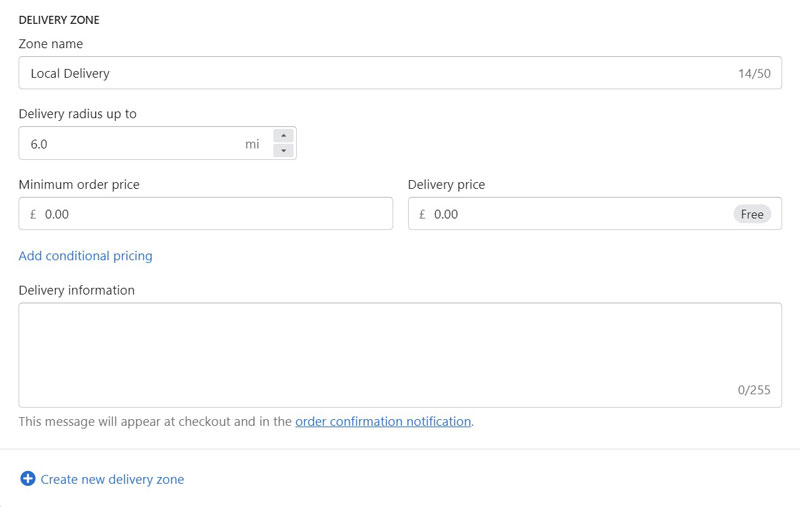
You can also add additional delivery zones, which can be used for additional radius or postcodes for which you may want to charge additional delivery charges.
How to Set up Local Pickup in Shopify
There is also an option for local pickup, meaning that customers can place an order on your website and then come and pick their order up from one of your locations.
To add local pickup, simply click on the location from which you would like to add this option and you will be taken through to the settings page, to activate local pickup, just click the checkbox and the options will appear.

There is only one option for this and that is to set the ‘Expected time until the order should be ready and there are a few options for this:
- Usually ready in 1 hour
- Usually ready in 2 hours
- Usually ready in 4 hours
- Usually ready in 24 hours
- Usually ready in 2-4 days
- Usually ready in 5+ days
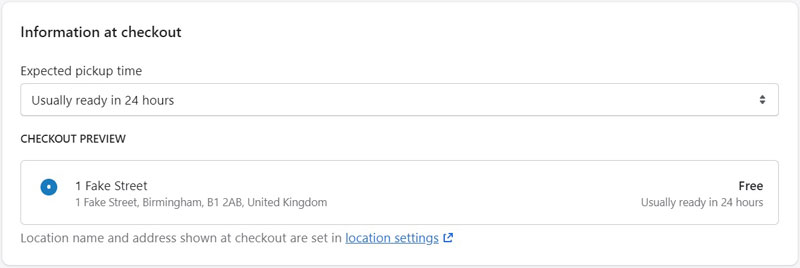
The final section on the page is to input any collection information that you require in order for customers to be able to collect their order such as order confirmation, ID etc and this will be displayed on the order confirmation page.

Other Shipping Settings
There are some other settings that can be configured on the Shipping and delivery page.
1. Package Size
The first one of these is the package size and if you are shipping items and use any auto-calculated shipping, then you will need to enter the dimensions of your package/s here, otherwise Shopify will use a sample box to make the shipping calculations and this could mean you are overcharging and overpaying for your shipping.

2. Shipping Labels
If you buy your shipping labels directly through Shopify, then you can use this section to run test prints for both desktop and label printers along with the options to purchase packing slips, printers and/or a scale from Shopify’s own hardware store.
It will also show the local carriers that they use here and this depends on the country where your store is based as to the options that are available.
3. Packing Slips
If you want to customize the standard Shopify packing slip, then you can do that here but this is done using HTML, CSS and the Liquid language, so knowledge of these languages is required in order to make any changes.
4. Carrier Accounts
You can connect accounts that you have with selected carriers (UPS, USPS, Canada Post, FedEx), which can help streamline the process if you use any of these options.
5. Custom Order Fulfilment
If you use third-party companies to fulfill your orders, you can add them to your Shopify store in this section by entering a name and email address.
Once this has been added, there will an additional section available in the inventory section of the product page and you can specify how much stock is at the fulfillment partner and when an order is placed and you mark it as fulfilled in the order manager, the fulfillment company will be sent an email instructing them to ship the order.
Conclusion
Setting up shipping on Shopify can seem a little daunting at first as there are so many options available but Shopify have tried to make each process as simple as possible but it is still best to take your time when setting up the shipping options to make sure that:
- You understand what you are setting up
- You have set it up correctly
And this is why it can be useful to go through your checkout and make sure that everything is working as you want it to before opening your store up to paying customers.
Hi, I'm Paul, the Owner and Founder of EcommerceGold.
I ran my own Ecommerce Business for over 7 years and now help others start their own online retail empires!

