Want to add Shopify to a subdomain on your site but don’t know how? Don’t worry, this short tutorial will take you through all the steps you need to set up your Shopify store.
There can be many reasons for wanting to do this but the most popular one is that you have an existing site, such as a WordPress blog and you want to keep the main site but also have a fully-fledged ecommerce store and the options available for WordPress don’t really do it for you.
This is where adding Shopify to a subdomain such as shop.yourdomain.com is the best option but to do this, you will need access to your cPanel.
EcommerceGold is reader supported and we may earn a commission from products or services purchased through links on our site at no additional cost to you, to learn more please see our affiliate disclosure.
Step 1: Create a Shopify Account
Might sound obvious but you will need to create a Shopify account in order to be able to add it to your subdomain. If you don’t already have one, you can sign up to Shopify by clicking here.
Step 2: Create a Subdomain in cPanel
Once you have got your account with Shopify set up, it is time to start getting things ready in your Cpanel. If you don’t know how to access this, ask your web hosts and they should be able to tell you.
Once in your cPanel, you will need to find the domain section and click on Subdomains.

In this section of your cPanel, you will see any of the subdomains that have been created for your website and there will be a section to add a new subdomain.

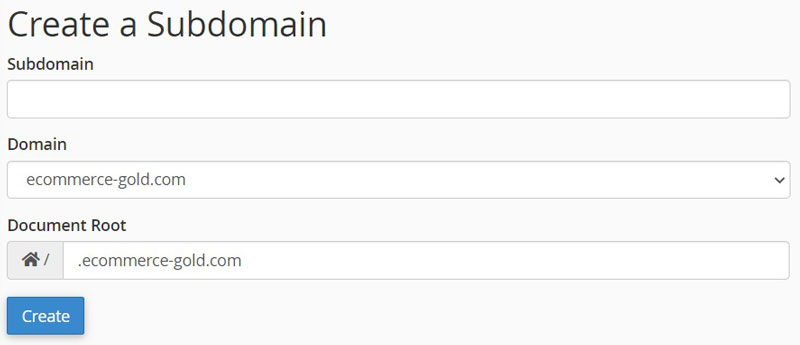
In this section, you want to add the name of the subdomain, which for this example we will call shop, then select the domain you want this to become a subdomain for (if you only have one domain name linked to your cPanel, there will only be one option to choose from).
The Document Root will automatically be allocated to the domain that you selected.
Once you are happy with the name of of the subdomain and the domain it will be used on, click create and you should get a confirmation message that your domain has been created.
Step 3: Configure Sundomain
Now that you have created your subdomain, you need to configure it so that it points towards the Shopify servers, to do this, you want to go into the Zone Editor, which is also in the Domain section of the cPanel homepage.

In the zone editor, you will see a list of all the domains that are linked to your cPanel, click on Manage next to the domain that you just created the subdomain for.
The next page can be a little bit scary as it lists all of the DNS records for that domain, including subdomains and what you want to do is find the:
- A Record for your new subdomain, which would look like shop.yourdomain.com
- A Record for the www version, which would look like www.shop.yourdomain.com
- TXT Record for the domain which would look like shop.yourdomain.com
You want to make a note or take a screen shot, so that you can revert to these settings should you need to in future. Once you have recorded the default setting, you want to delete these three records.
Step 4: Point Subdomain to Shopify
Once the records mentioned above have been deleted, you can then start setting up new CNAME records to point your new domain name towards Shopify.
There are a couple of ways to do this, the first one is on the Manage page for your chosen domain, which is the page you just deleted the records from. At the top of the records page, there should be an option to add a new record and some boxes will appear.

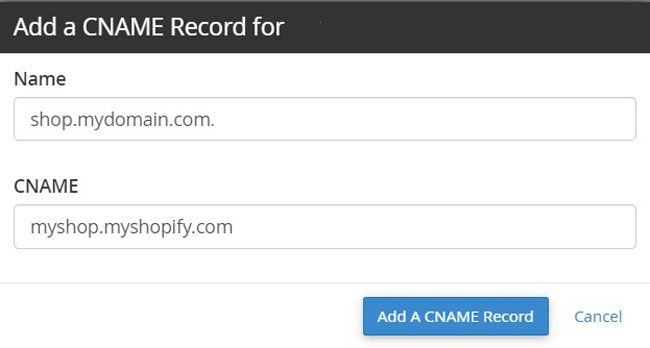
Or you can choose to go back to the main Zone Editor page a click on +CNAME Record, which will bring up the following pop up:

For me, I think doing it in the manage page is the easier of the two options as the pop up box in the image above has a tendency to disappear!
Whichever option you choose, you want to add the following CNAME records:
- shop.mydomain.com. – mystore.myshopify.com
- www.shop.mydomain.com. – mystore.myshopify.com
Make sure there is a dot after your domain name, just like I have done above, otherwise it might not accept it and once these records have been created, they should be added to the bottom of the list within the manage screen.
Step 5: Add Subdomain to Shopify
Now that your new subdomain is pointing towards Shopify servers, you want to go in and point your Shopify store towards this new domain name.
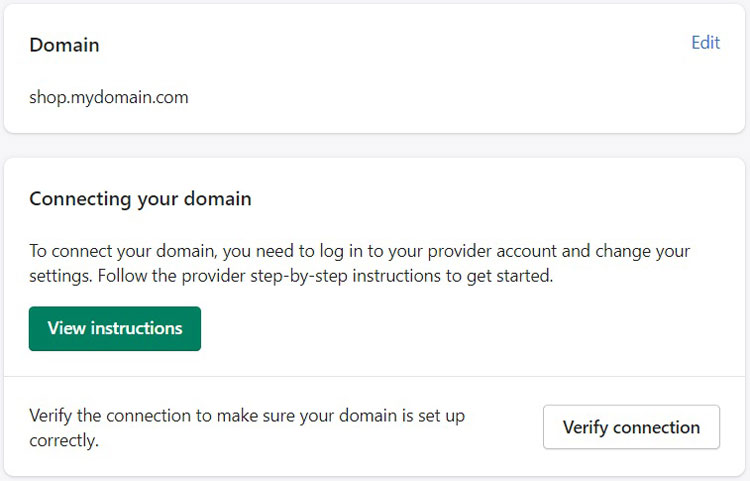
To do this, go to Online Store → Domains in your Shopify dashboard and click Connect Existing Domain and the following screen will appear:

Simply enter your subdomain in the box (without the http://www at the start) and click next. The next page will ask you to verify the connection and if everything has been set up properly, Shopify should quickly verify the domain.

Your subdomain should then appear in the list of domains available in your Shopify dashboard, alongside the .myshopify.com domain.
It might take up to 24 hours for things to properly sync as DNS changes can take this long, so don’t be surprised if it isn’t available immediately.
Once the DNS has propagated, it should show as connected within your Shopify dashboard and if you go onto your subdomain, your Shopify store should appear.
Conclusion
So that is how you set a Shopify store up on a subdomain, it is pretty easy to do, when you know what you are doing!.
This can give you the best of both worlds as you can keep your original website and have a fully hosted Shopify store available for your customers.
Linking to it is also pretty simple as you will simply add a link in your navigation menu to the subdomain, I would recommend have it open in the same window and also have links for your Shopify store back to your main website, so that the transition between the two is pretty seamless.
I would also try and match the design of the two websites as close as possible to once again make the transition between the two sites as seamless as possible.
Hi, I'm Paul, the Owner and Founder of EcommerceGold.
I ran my own Ecommerce Business for over 7 years and now help others start their own online retail empires!

