Selling digital products can be hugely profitable but how do you set up a Shopify store in a way that allows you to sell them?
Well, that is exactly what I am going to show you in this post and you will need an app for this and most people will go for the free Digital Downloads app by Shopify but the reviews are mixed, reliability is seemingly an issue and from my experience, it is pretty basic.
This is where apps developed by third parties come into play and I tried out the 4 highest rated digital products options and the Easy Digital Products App by Axel Hardy just beat the Digital Downloads by Uplinky App for one main reason:
- The ability to sell Licence Keys
This feature alongside the digital downloads functionality makes the Easy Digital Product app a very good all-around option for selling digital products on Shopify and below, I will show you exactly how to use it.
*For this tutorial, I am going to be using the free package but will also go through the features that are available on the paid package.
1. Install Easy Digital Products App
The first step in creating a digital product in Shopify is to install the Easy Digital Products app and you can either go through one of the links in this post or go to your Shopify Dashboard → Apps → Shop for Apps → search for Easy Digital Products and it should appear something like the image below:
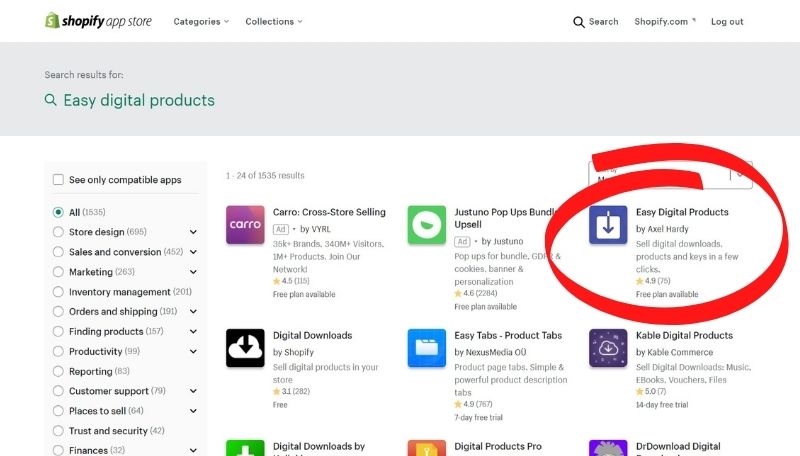
Make sure you install the one made by Axel Hardy as that is the one that I am going to be covering in this tutorial.
2. Create a Virtual Product in Shopify
The next step is to create a virtual product in Shopify and this is very simple to do, just go to Products → Add Product and fill out the page as you would when creating a normal product on Shopify, so add:
- Title
- Description
- Media (Product Images)
- Price
- Add Variations if Required
But you want to make sure that you uncheck the This is a physical product option in the shipping section.

This disables all of the shipping options in the checkout, which isn’t required for digital products as you can’t post them, obviously!
If you are going to be selling unlimited numbers of your digital product, then you also want to uncheck the track inventory option in the Inventory section.
I would recommend keeping the product as a draft at this point as you haven’t yet added the digital element to the product yet and if you set it to active, you may have people literally buying nothing from you.
3. Add a Digital Download to the Product
Now the only negative that I have with the Easy Digital Products app is that there is no way to directly from the product you just created to the app, instead you need to go to Apps → Easy Digital Products in order to be able to add the digital element to your newly created product.
When you first go into the app, it will look similar to the image below and to add a downloadable product, click on the +CREATE DIGITAL PRODUCT/VARIANT button.
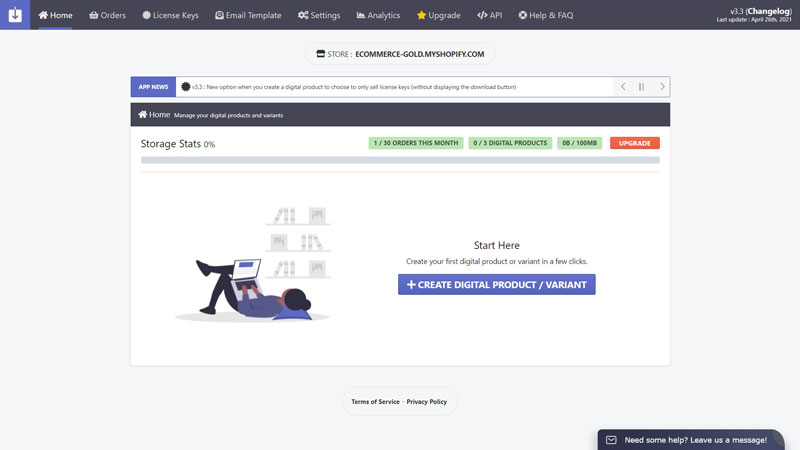
Once this button has been clicked, a pop-up will appear asking you to search for the product that you want to add the digital product to, simply start typing the title of the product you just created and click search.
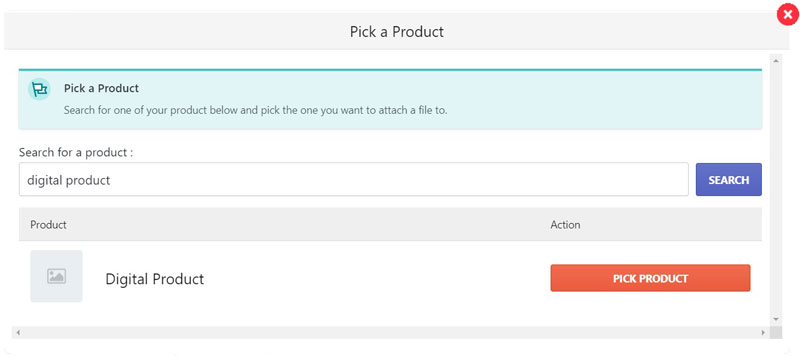
The search will then return any products containing the words you just typed into the search bar, once you have found the product you want to add a download to, simply click the PICK PRODUCT button and a new pop-up will appear.
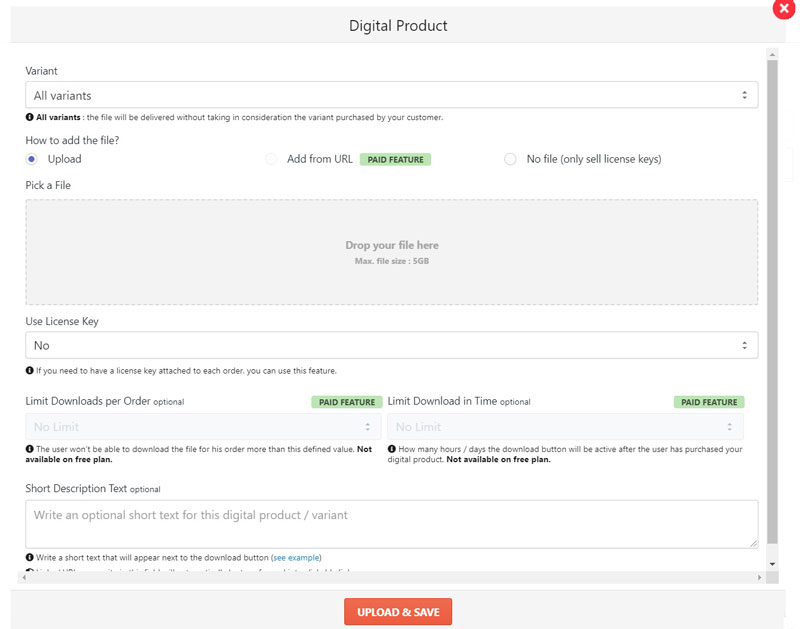
The first thing you want to do is to choose which variant the digital product will apply to, if you don’t have any variants for your product, simply select All Variants or if the product does have variants, use the dropdown menu to choose which variant you want to add the file to.
To upload a file, you can either drag your file into the grey box under the Pick a File heading or you can click on that box to bring up a browse tab for your device.
Once your file has been uploaded, you can then choose whether or not the product has a licence key (which will be covered more below) and if it has, you can either have the app randomly generate one for you or use one that you have uploaded.
If you are using the paid version of the app, you can also:
- Add a file from a URL
- Set a maximum amount of downloads per order
- Set a maximum time limit for the download to be accessible
Once you have uploaded the product and are happy with the rest of the setting, just click save and that file will then be added to your chosen product.
4. Selling Licence Keys
This won’t be applicable for most downloadable products but if you are selling software licences or game codes, then this is something that you are going to need on your site and this app is one of the few on Shopify that offers this functionality.
For most licence keys, you will be provided with a selection of these to sell on to your customers and to add these to your store is very simple, just go to the licence key tab within the app and the following screen will be shown:
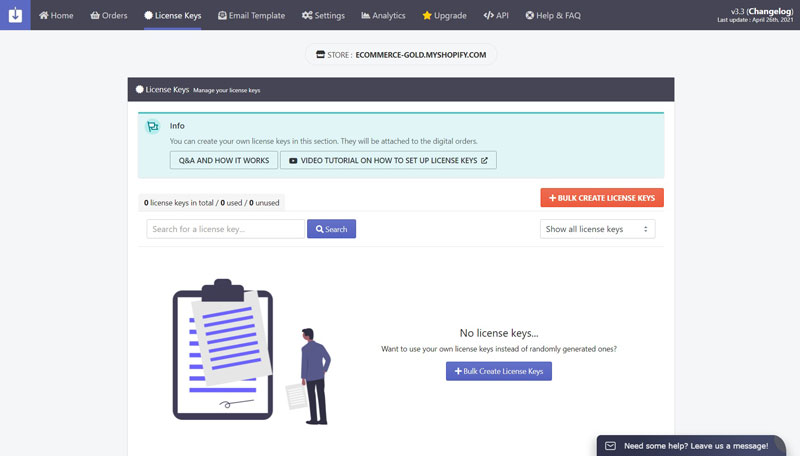
To add your licence keys to the app, just click on the +BULK CREATE LICENCE KEYS button and the following pop up will appear:
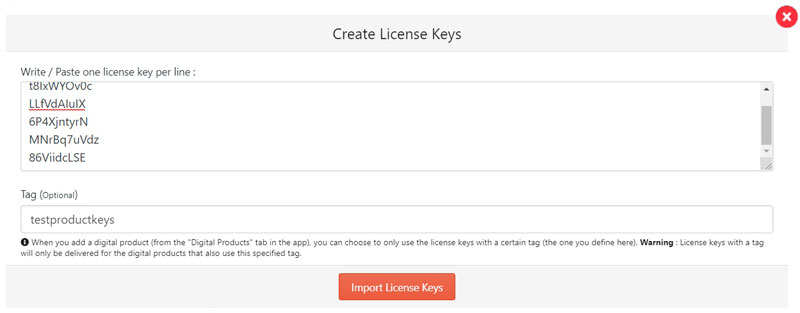
To add your keys, copy and paste them into the top box, making sure that there is only one product key per line. Next, you can choose to add a tag to these keys, which is something that you will want to do if these keys are only to be used with certain products (on available with the paid version).
Once you are happy with the keys you have listed and the tags, click Import Licence Keys and the app will double check with you if you want to import the keys listed and if you are, just confirm and they will be imported into the app.
After the tags have been imported, follow the same process as outlined above in the Add Digital Download section but when you get to the file upload screen, select No File (only sell licence keys) and a slightly different page will be displayed:
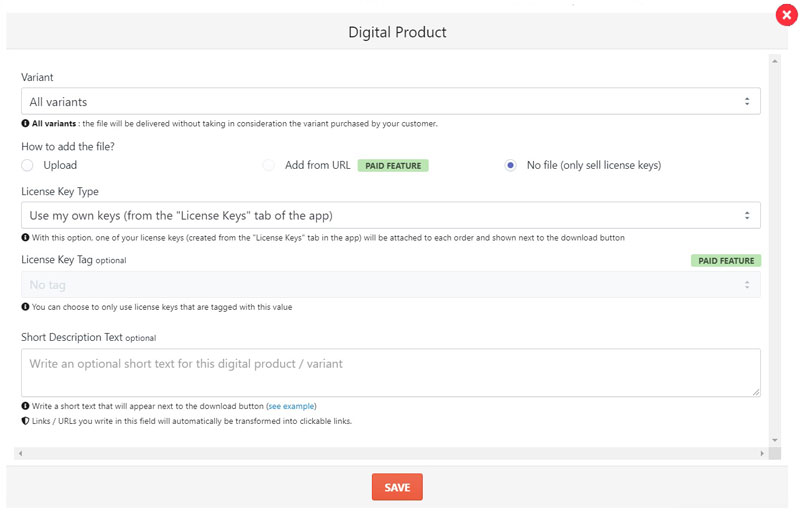
To use the keys that you just uploaded, select Use my own keys from the dropdown menu and also the tag that you created for the keys, this will then link those keys to this product.
Once you are happy with the settings, click save and the keys will be linked to the product that you selected and are available to buy.
5. Settings
Before making the product live, it is worth checking over the settings to see if there is anything that you need to change and the app comes with some good options, including:
- How the button displays on the order confirmation page
- Whether you only want the download to be delivered upon successful payment
- If you want the product to auto-fulfil in the order dashboard
- Choose to add licence key to order notes or not
- Choose whether to display a download button in the customer’s order history page
- Enable or disable Shopify Fraud Checker
There are also some design options available such as the button and font colour and the text that displays in relation to your digital products.
If you are on a paid plan, you can also customise the email that is sent to your customers that contain the download link.
Make the Product Available for Sale
You may recall that the product we created in Shopify was saved as a draft product, well now we have added the downloadable product or licence keys, you want to go back in to the product and change it from draft to active as there is now something for the customer to actually buy.
Conclusion
So that is how you can add digital products to a Shopify store and even though some features are only available if you use a paid version of the app, the features you get are considerably better than those available with the free Digital Downloads app from Shopify, which will get the job done but the Easy Digital Products app just does it better and also allows you to sell licence keys.
The app is also highly rated, getting a 4.9/5 from 75 reviews, which is pretty impressive (especially when compared to the 3.1/5 for the Shopify offering!). Users not only compliment the features of the app but also the support from the developer behind it and as it offers a free plan, why not try it out for yourself!
Hi, I'm Paul, the Owner and Founder of EcommerceGold.
I ran my own Ecommerce Business for over 7 years and now help others start their own online retail empires!

