The COMPLETE Step by Step WooCommerce Tutorial
Many people and businesses recommend WooCommerce for building an online store but how do you actually build an ecommerce website with WooCommerce?
Well, that is what we are going to be looking at in this post and we are just going to be looking at setting up the core WooCommerce plugin for physcial products on a self-hosted WordPress site and we will leave links to any relevant tutorials that require additional plugins.
Before you can start setting up your WooCommerce site, you first need to get WordPress set up and for this, you will need:
- WordPress hosting
- A domain name that is pointing towards your web hosts servers
- An SSL certificate installed
- WordPress installed on the https protocol
Once you have got your WordPress site installed and set up correctly, then you can begin setting up your WooCommerce store, which we are going to cover in detail below.
EcommerceGold is reader supported and we may earn a commission from products or services purchased through links on our site at no additional cost to you, to learn more please see our affiliate disclosure.
Step 1: Install and Activate WooCommerce
The first step is to install and activate the WooCommerce plugin, this can be found in the WordPress plugin library and can easily be found by simply searching for WooCommerce and the one you want to install is by Automatic and has 5+ Million Active Installs.
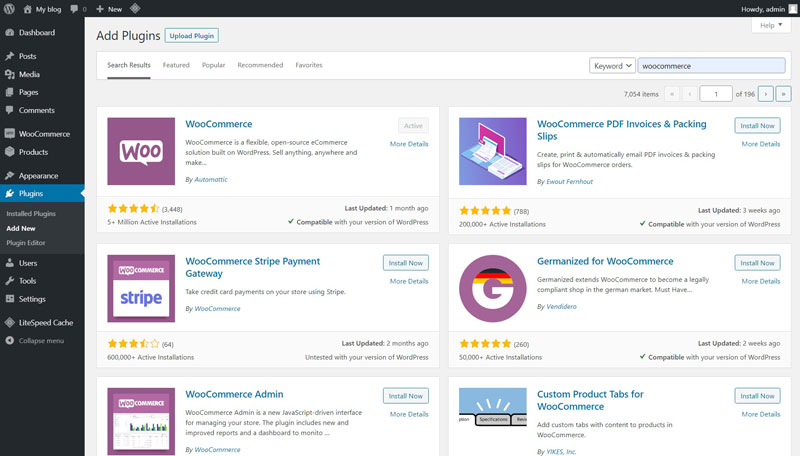
When you install and activate WooCommerce it will automatically create 3 pages on your WordPress site, which are:
- Checkout
- My Account
- Shop
These all work on shortcodes and it is best to leave these are they are, especially when you are just getting started with WooCommerce, it will also add links to these pages in your main navigation menu.
Step 2: Setup Wizard
Once you activate the WooCommerce plugin, you will be taken through the quick start guide, which is five pages covering a few different aspects relating to your store.
It isn’t the most helpful setup guide but it is still worth going through and below are all the steps of the setup wizard.
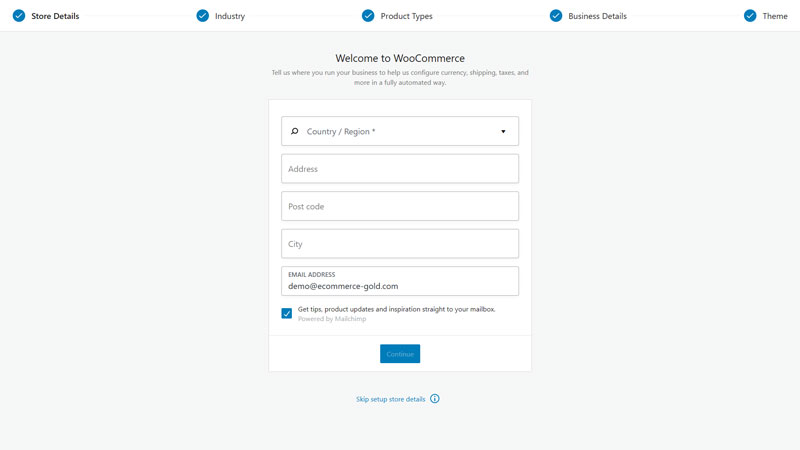
The first page is to enter your basic store details, which includes:
- The country and region (if applicable) where your store is based
- The address of your store
- The post/zip code
- City
- Email address, by default, this will use the admin email used when installing WordPress but if you are using a different email address for running your store, then enter it here
There is also a check box for whether you want to receive hints and tips from WooCommerce relating to your store.
Once all of the information has been entered, you can click on continue to move to page 2.
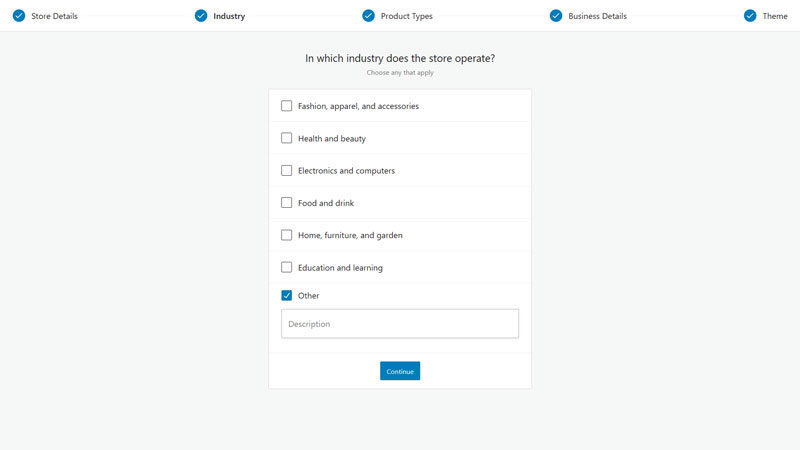
Page 2 of the wizard is very simple as you just select the industry that your WooCommerce store is going to be in, if it doesn’t fit in with any of the options presented, just click other and it is up to you whether you want to manually enter the industry or not.
But once an option has been selected, you can then move on to page 3.
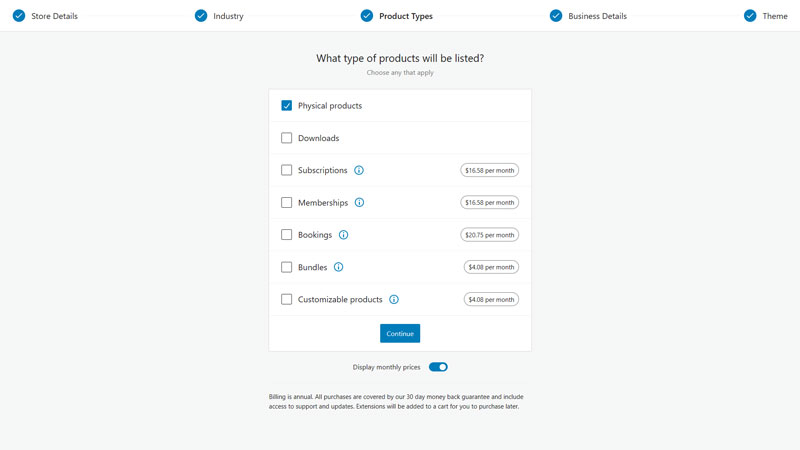
Page 3 of the wizard asks you what type of product you are going to be selling and presents a list of:
- Physical products
- Downloads
- Subscriptions
- Memberships
- Bookings
- Bundles
- Customizable products
Physical products and Downloads are included with the core WooCommerce plugin and you want to select which one you are going be selling or both if you are selling both.
The other options on the list are all additional features that require paid plugins which are purchased directly from WooCommerce and if you need any of these features, we recommend doing some research to find the best plugins for that feature as the ones made by WooCommerce may not be the best option.
Once you have chosen your product type, you can move on to page 4.
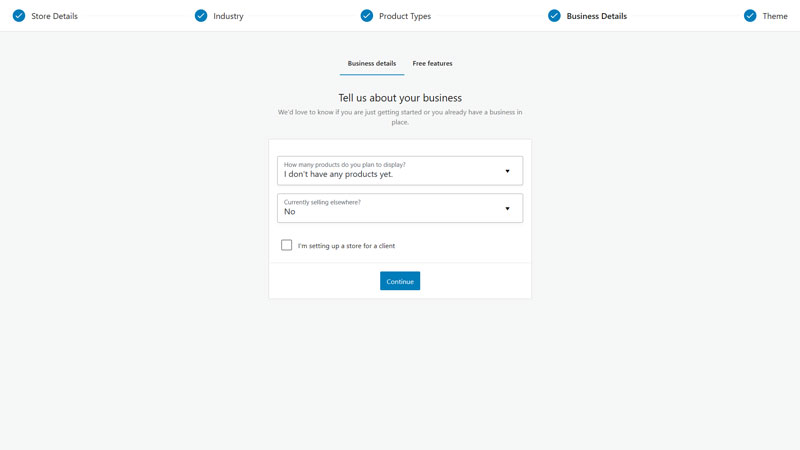
Page 4 is split into two tabs, the first one is some basic business details, including:
- How many products you plan to display and the dropdown menu includes options ranging from 0 to 1,000+
- Are you currently selling elsewhere, with a selection of options available in the dropdown menu and you simply select the one that applies to you
- A checkbox for developers who are building the store for a client
Once you have chosen the applicable options, clicking continue will take you to the second tab which is free features.
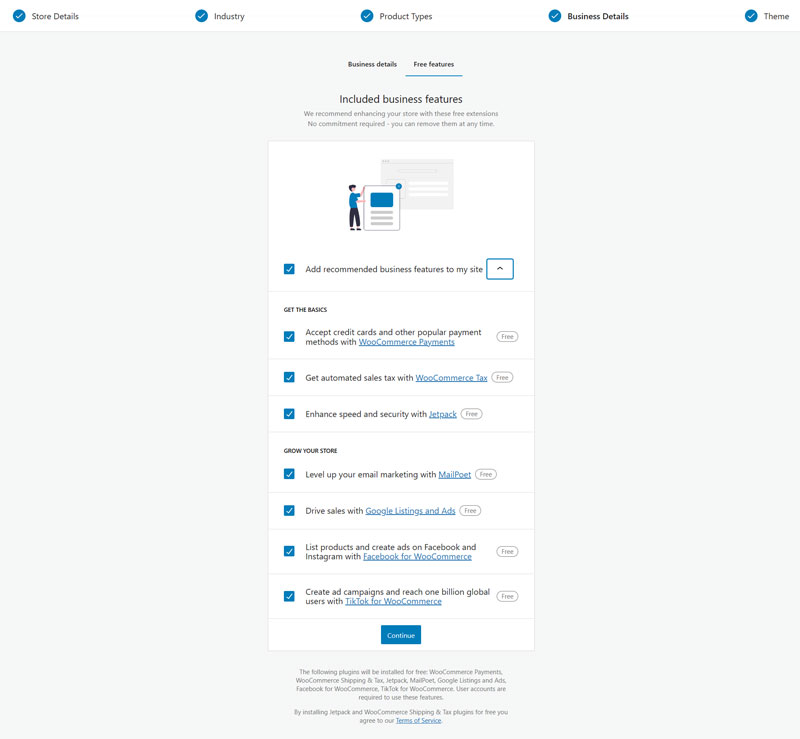
The free features tab shows you a list of free plugins that you can choose to install on your WooCommerce store but initially, this list is hidden and the ‘Add recommended business features to my site’ checkbox is ticked and if you just hit continue, it will install 7 additional plugins on your site.
We recommend that you open the list to check the options that are available and make a note of the plugins available but don’t install them, instead you want to find the best plugin available for the feature you need and once again, it may not be the one made by WooCommerce.
But this is completely up to you and once you have decided which, if any of the recommended free plugins you want added to your site, click continue and any selected plugins will be installed in the background.
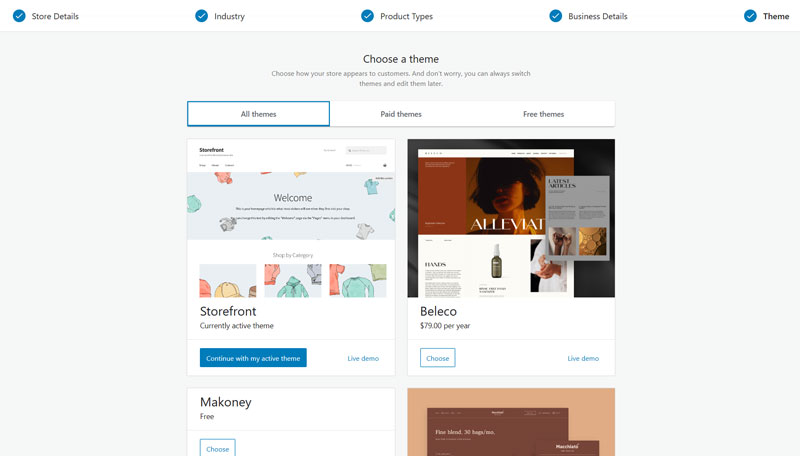
Page 5 gives you the option to install a WooCommerce compatible theme and it shows you some free and paid options, all of the options shown are themes developed by WooCommerce and there are many more free and paid options available.
If you are just getting started on your first website and haven’t chosen a theme yet, we recommend installing Storefront, which is a free WooCommerce theme that is a good placeholder until you choose the theme you are going to use for your live store.
If you already have a theme selected, then you can just scroll to the bottom of the page and click Skip this step and you will be taken to the WooCommerce home in your WordPress dashboard.
Step 3: WooCommerce Settings
Considering it is called a setup wizard, it really doesn’t help you set much up on your WooCommerce store, which is why we added this section to help you work through all of the WooCommerce settings to help you get your store set up properly.
Permalinks
The first thing you want to do is to set up your store’s permalinks and this can be done by going to the main WordPress settings and clicking on the Permalinks option.
If you are not sure what permalinks are, they are the structure you choose for your site’s URLs and there are two different types of permalink you can set up.
The first set of permalinks is for your site’s pages and blog posts and for most stores, selecting the Post Name option is going to be best but to set up the permalinks for your store pages, you want to scroll down to the bottom and you will see a second set of options.

There are four options when it comes to setting up the WooCommerce permalinks:
- Default – the most basic and when a customer clicks on your product page, the URL will be yourdomain.com/product/your-product/
- Shop base – this uses the shop as the base for your URLs but doesn’t include the category and will appear as yourdomain.com/shop/your-product/
- Shop base with category – this includes the category in the URL and will appear as yourdomain.com/shop/category/your-product/
- Custom base – this allows you to use a custom base for your store, so if you are using a different page name as a base for example
Your permalink structure does have a small impact on your store’s SEO and if you are using categories, we would go for the Shop base with category or if you aren’t using categories, then we would go for the Shop base as this helps search engines understand how your store is mapped out.
If you are using a custom setup, then obviously you want to configure this using the Custom base option.
Once you have chosen your permalink structure, click save and this will then be set up on your store and it is best to do this first, as it can save a lot of headaches further down the line.
General Settings
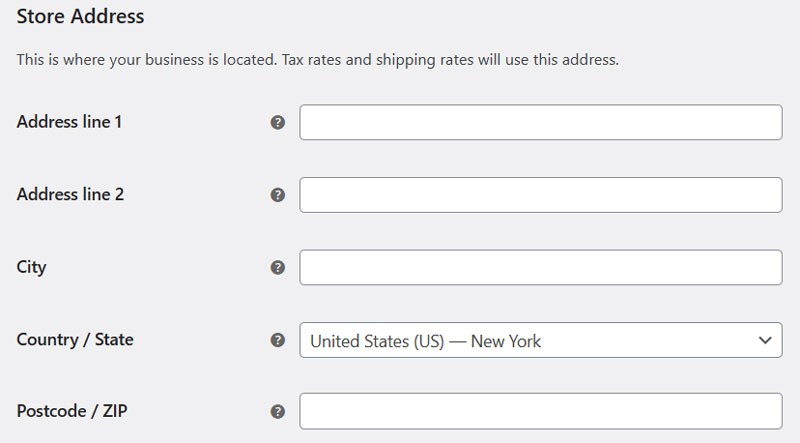
Once you have got your permalinks set up, it is time to start configuring the WooCommerce settings and these can be found by going to WooCommerce → Settings and the first page is the general settings, with the first section being the store address.
If you went through the setup wizard, then most of this will already be entered but if there is anything you need to change, then you can do so in this section.
This is the address where your store is based and all taxes and shipping rates will be based off this address, so make sure it is correct.
The second section under the general settings tab is the General options and you want to get these configured correctly.

The General options includes the following settings:
- Selling location(s) – this is where you select all of the countries that you sell to and there are three options in the dropdown menu:
- Sell to all countries
- Sell to all countries, except for – a box will appear, which allows you to search for and add all the countries that you don’t sell to
- Sell to specific countries – a box will appear allowing you to search for and select the countries you are going to sell to
- Shipping location(s) – this is where you choose all the countries that you ship to and there four options in the dropdown menu:
- Ship to all countries you sell to – this is the default option as most stores will ship to the countries they sell to
- Ship to all countries
- Ship to specific countries – a box will appear allow you to select which countries you ship to
- Disable shipping and shipping calculations – if for some reason you don’t want shipping active on your store, then you would select this option
- Default customer location – this is where your customers are located and there a four options to choose from:
- No location by default
- Shop country/region – this is if most or all of your customers are going to be based in the same country as your store
- Geolocate – your site will find their location based on their IP address
- Geolocate (with page caching support) – similar to the Geolocate option but if you use page caching, then you will need to select this option
- Enable taxes – this is a checkbox to enable taxes on your store, the rates can be configurable and the tax rate will be calculated during the checkout
- Enable coupons – this will enable the use of coupons on your store and add a coupon box to your checkout page, if you don’t offer coupons then leave this unchecked as it removes a distraction from your checkout. If you plan on offer them periodically, then only activate this when your coupons are active
To use the Geolocate option, you will need to create an account with Maxmind and enter your license key on the Integration tab of the settings in order for it to work correctly.
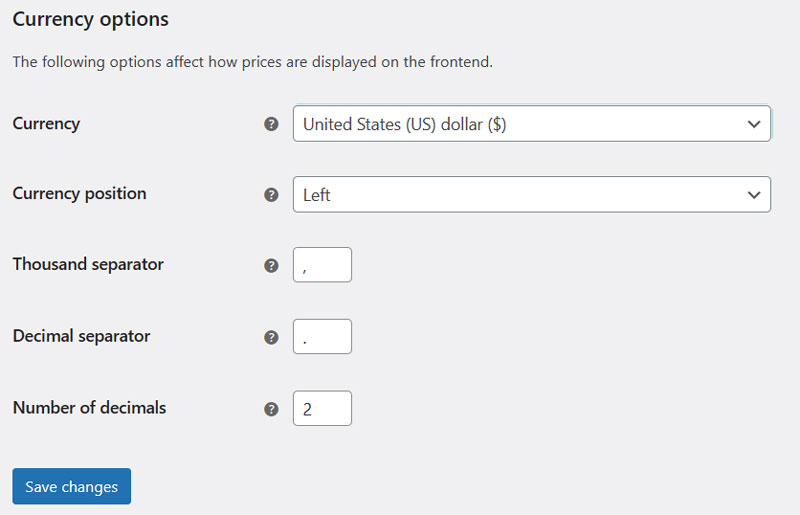
The final options on the General settings page are the currency options and these 5 options are very simple:
- Currency – choose the currency for your WooCommerce store
- Currency position – choose where you want the currency symbol to be displayed
- Thousand separator – choose the symbol for separating the thousands, this is set to a comma by default and if you don’t want a separator, then leave this box blank
- Decimal separator – choose the symbol for your decimal separator, set as a point by default
- Number of decimals – choose how many decimal places you show, if you don’t want to show any then set this to 0
Once you have entered all your settings on this page, make sure you click the ‘Save changes’ button at the bottom otherwise they won’t be saved and you will have to go through them again.
Product Settings
The next tab is the product settings and as we are only looking at physical products for this guide, we will only be looking at the General and Inventory options.
General Product Settings

The first set of options are about the Shop pages:
- Shop page – this is the page that will be the home for your shop, by default, this is set to the Shop page that WooCommerce automatically creates when you install the plugin but if you want to use it on another page, then create this page and select it from the dropdown menu. You will need to update the permalinks to use your custom page as the base for your shop.
- Add to cart behavior – this is what happens when a customer clicks that add to cart button and there are two checkboxes:
- Redirect to the cart page after successful addition – this simply redirects the customer to the cart page when they click the add to cart button. This can be good if you are using something like ‘Buy Now’ on the add to cart button
- Enable Ajax add to cart buttons on archives – this sounds complicated but what this does is stops the page from refreshing when the customer adds the product to their cart, which provides a better user experience
- Placeholder image – if you don’t have a product image and want to use a placeholder, this is where you set it up, simply upload your chosen image and then enter the attachment ID or image URL (can be found by clicking on your chosen image in the media section of the dashboard)

The second set of options are the measurements that you are going to be using on your site and there are two to configure:
- Weight unit – there are 4 options in the dropdown menu: kg, g, lbs and oz
- Dimension unit – there are 4 options in the dropdown menu: cm, mm, in and yd
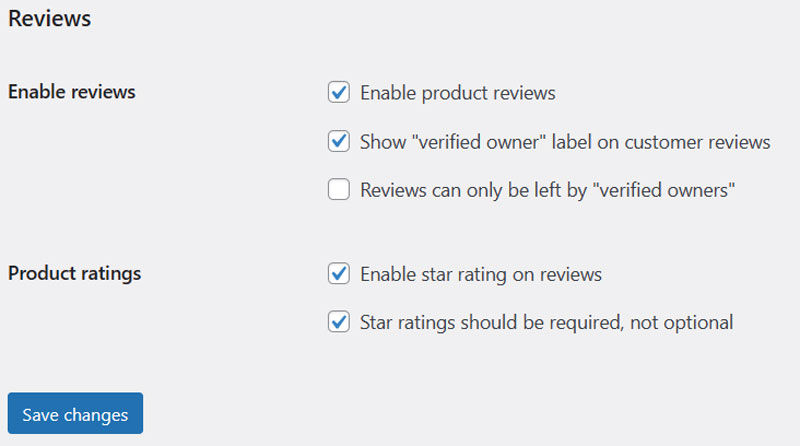
The final set of options in the General settings are for product reviews and this is a pretty good standard feature of WooCommerce and can be beneficial to your site’s SEO and help you improve conversion rates.
They aren’t the best visually, so you may want to look at some of the review plugins that are available for WooCommerce but if you just want to add simple product reviews to your store, then these will work just fine.
4 of the 5 checkboxes are ticked as standard and if you only want product reviews from actual customers, then make sure to check the ‘Reviews can only be left be “verified owners”‘ box, otherwise, anyone can leave a review.
Inventory Settings

The next set of options are related to your inventory settings and there are a few options:
- Manage stock – this is for if you want to manage stock level on your store, which for physical products, you want to do
- Hold stock – this is the time in minutes that you hold stock in customer’s carts, after this time elapses, the pending order is canceled and the stock is once again available for purchase. If you don’t want to have this active, leave the box blank
- Notifications – 1 checkbox for low levels and 1 for out of stock, simply check which ones you want notifications for
- Notification recipient(s) – enter the email address/addresses for the low or out of stock notification emails to be sent to
- Low stock threshold – enter the stock level at which the low stock notification email is triggered
- Out of stock threshold – enter the stock level at which the out of stock notification email is triggered
- Out of stock visibility – check this box if you want to hide out of stock items from your site’s visitors
- Stock display format – there are three options to choose from the dropdown menu:
- Always show quantity remaining in stock
- Only show stock quantity remaining when low
- Never show quantity remaining in stock
Shipping Settings
The next set of settings are related to shipping and this might seem a little daunting at first as there are a few different options to consider but as with the other settings, we have covered everything step by step below:
Shipping Zones

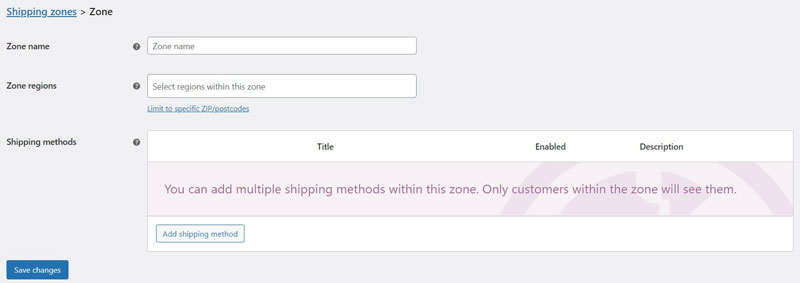
Shipping zones are the areas in the world where you are going to be shipping your items and where you set the different methods and prices. You can choose to edit one of the existing zones or create a new one but the process is basically the same.
On the add/edit shipping zone page, you will see the following options:
- Zone Name, this is whatever you want the zone to be called
- Zone Regions, this is where you select the countries are included in this zone. With some countries such as the USA and Canada, you will be able to select which states/provinces you want to post to for other countries, it will just cover the whole country.
- Shipping Method, the type of shipping method you are using and how much it will cost.
You can also be very specific about where this zone applies by limiting it to specific postal or zip codes, this can be done by clicking the link under zone regions.
If you sell internationally, then you are going to have to create multiple shipping zones to accommodate for all of these options and add shipping methods for all of these zones.
When adding a new shipping method, WooCommerce will ask you if you want to add a:
- Flat Rate – set a fixed rate for your shipping
- Free Shipping – offer free shipping, which is triggered with a valid coupon and/or a minimum order value
- Local Pick-up – lets customers pick their order up from your premises
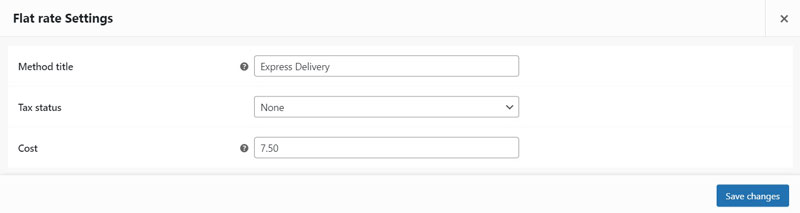
When creating a flat-rate shipping method, you will be asked to create a title for the method, the tax status (applicable if you charge tax on shipping) and the cost of the method.
You can add multiple methods to any zone, so you may have a standard shipping method, an express shipping method and local pick-up as an example.
If you want to offer free shipping across all of your products, you will need to create a flat-rate option and set the tax status to none and the cost to 0.
If you want to add a paid option, for example express delivery, just add another flat rate option with your chosen rate.

Shipping Options

Next up is the shipping options and there are three options here:
- Calculations – there are two checkboxes here:
- Enable the shipping calculator on the cart page – this only needs to be checked if your shipping needs to be calculated
- Hide shipping costs until an address is entered – this keep the shipping cost hidden until an address has been entered, which can be useful if you have different rates for different countries etc
- Shipping destination – this is the address that the order will be shipped to and there are three options:
- Default to customer shipping address
- Default to customer billing address
- Force shipping to customer billing address
- Debug mode – enable this if you are having issues with your shipping and need to run diagnostics to find out what the problem is
With the shipping destination, you may want to check with your payment gateway to see if they have any specific requirements when it comes to the address you are sending to as some will only provide fraud or seller protection on orders that are sent to the billing address.
Shipping Classes
The third set of options under the shipping settings are for shipping classes and these can be very useful if you have some items that you need to charge extra for, for example:
Say you sell artwork, a small print the size of a postcard isn’t going to cost the same amount to ship as a full-size print and you can use shipping classes to charge accordingly.
To add a shipping class, click on the add shipping class button and you be asked to enter a:
- Name
- Slug
- Description
Once these have been entered, you can choose to click save to create the shipping class or add another one if you wish.

Once you have created the shipping class, you need to go back to the shipping zones sections in order to set up the prices for these classes. You can either edit an existing or create a new shipping method to do this.
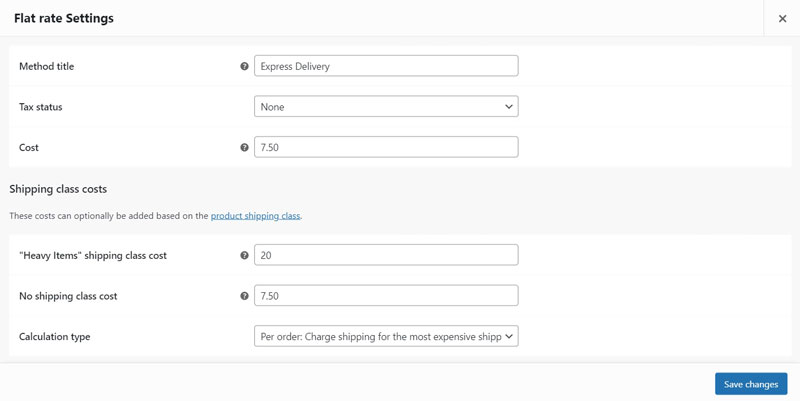
When you have created a shipping class, you will see that there are some additional sections that appear (the number depends on the amount of shipping classes you create), which include:
- Cost of the shipping class
- No shipping class cost – this is what will be charged if no shipping class is selected for the product
- Calculation type – you can choose how the total shipping is calculated and there are two options:
- Per class, this is where you charge shipping for each individual class
- Per order, there is where you charge shipping for the most expensive class for the whole order
Which option you choose for the calculation type will depend on how you ship your orders, if they are going to be shipped individually, then you would choose the per class option, if they are being shipped together, then you would choose the per order option in most cases.
We will show you how you can select your shipping class for your products later in the guide.
Payments Settings

The next set of options are to set up your payment methods but as standard, WooCommerce only offers 4 options:
- Direct bank transfer
- Check payments
- Cash on delivery
- PayPal Standard
The setup process for the three offline methods are very simple and simply clicking the Finish set up button will take you through to the relevant page and you just enter the instructions for your customers, which will appear in the checkout.
You can also link the Cash on delivery option to on of your shipping methods, for example if you do in-store pickup or local delivery.
The only online payment option is PayPal Standard but we wouldn’t recommend using it as it doesn’t offer the best experience for your customer or you as the merchant and PayPal Checkout is a much better option but for this you will need to install a plugin.
And this is the same for if you want to accept credit cards, either via WooCommerce payments (powered by Stripe), Stripe, Square or whoever you choose for your credit card processing.
When it comes to payment apps that are available, there are official WooCommerce ones but these don’t get the best reviews or ones made by third-party developers, which in many cases get much better reviews, so it is best to spend some time doing some research to find the best option for your site.
Accounts & Privacy Settings
The final set of settings we are going to cover in this guide is the accounts and privacy ones, which are quite important!
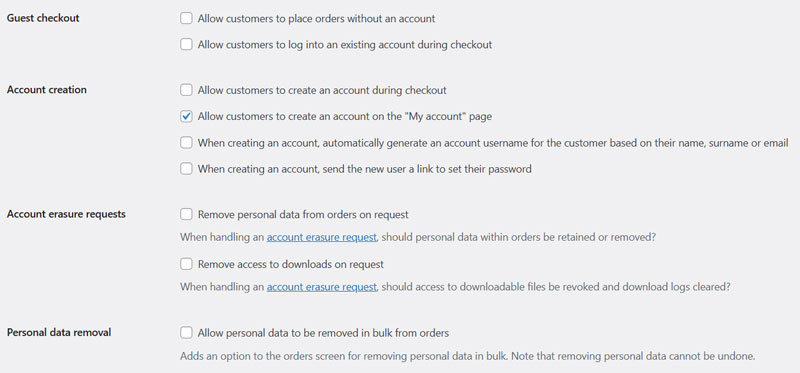
The first set of options are related to checkout and customer accounts:
- Guest checkout – this is whether you allow customers to checkout without creating an account and there are two checkboxes:
- Allow customers to place orders without an account
- Allow customers to log into an existing account during checkout
- Account creation – these are the settings for customers who want to create an account on your site and there are four checkboxes:
- Allow customers to create an account during checkout – possibly the easiest way to let customers create an account
- Allow customers to create an account on the “My account” page
- When creating an account, automatically generate an account username for the customer based on their name, surname or email
- When creating an account, send the new user a link to set their password – adds an additional step to the account creation process, which may negatively impact conversions
- Account erasure requests – to help your store become compliant with various data regulations around the world, your customers need to be able to request that you erase their data and this provides and there are two checkboxes:
- Remove personal data from orders on request – this removes any personal data such as name, address and email from your order records
- Remove access to downloads on request – if you are selling downloads, then you can remove access to these downloads following a data removal request
- Personal data removal – this is a checkbox that adds an option in the order management page to remove personal data from orders in bulk

The second set of settings are related to your privacy policy and if you click on the privacy page link, you will be taken through to the page in WordPress that allows you to create a privacy policy and with WooCommerce installed, it will add some options relating to your online store but before going live with your store, you should get your privacy policy checked to ensure it is legal.
Once your privacy policy has been setup, you can then choose to edit the text relating to customer notifications regarding your privacy policy on the registration page and in the checkout.

The final set of settings are related to how long you retain data on your site and how long you are allowed to keep it may be dependent on certain regulations, so make sure you check all the ones that apply to your store.
But on this page, you can set the data retention for the following:
- Inactive accounts
- Pending orders
- Failed orders
- Canceled orders
- Completed orders
Simply enter the length of time and select either days, weeks, months or years from the drop-down menu next to each option.
These are the main settings you need to configure when setting up a new WooCommerce store and it is best to stick with the default WooCommerce settings on the Email and Advanced tabs (which is mostly developer tools).
Step 4: Create Your Categories
Once all of the settings have been configured in your WooCommerce store, you can then begin to start setting up the actual store part but before you start creating products, it makes life much simpler if you create the categories for them to go into first as this saves you from having to go back and edit your products in order to assign them to a product category.
To start creating your categories, go to Products → Categories but it can be helpful to have your category hierarchy figured out before setting them up, so you know what are going to be your:
- Parent Categories
- Child Categories
- Child-child Categories
- Child Categories
This also makes this step much simpler.
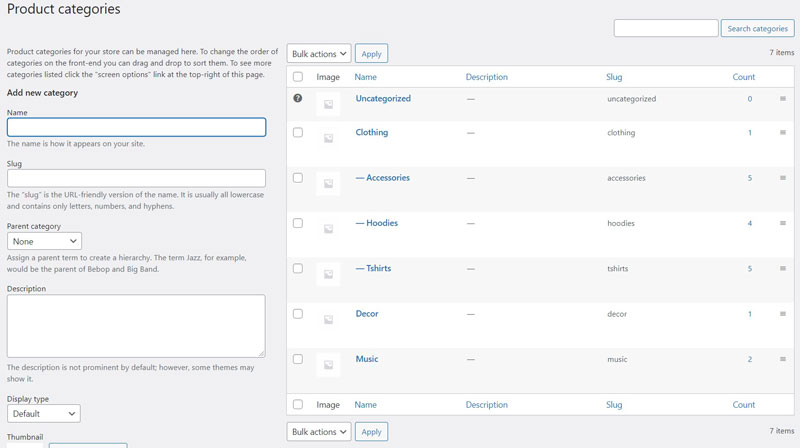
The add new category options are always on the left side of the category overview page and to add a new category, you want to:
- Name – enter the name of the category
- Slug – enter the slug, which goes in the URL
- Parent Category – select from the dropdown menu whether it is a parent category (by selecting none) or choose the parent category from the dropdown menu
- Description – enter a description, this is optional but if SEO is part of your marketing strategy, then putting a well-optimized description in here can be helpful
- Display type – choose either default, products (just shows products), subcategories (shows the subcategories) or both from the dropdown menu
- Thumbnail – choose a thumbnail image, only really applicable if you are going to be displaying the category, such as using the subcategories display type
Once all of the information has been entered, simply click add category and it will be added to the list on the left-hand side.
If you want to edit or remove a category, hover your cursor over the category on the list and you will see a selection of options occur, if you click edit, it will bring up a page which includes all the sections that are available when adding a new category.
Step 5: Adding New Products
With the foundations of your WooCommerce store in place, it is time to start adding your products and as this is a guide for selling physical products using WooCommerce, we are going to just look at setting up the following:
- Simple Product
- Grouped Product
- Variable Product
The processes for creating a Grouped or Variable product are only slightly different to a simple product and will cover these processes below the simple product, which will cover most of the aspects of the create a new product page in WooCommerce.
How to Create a Simple Product
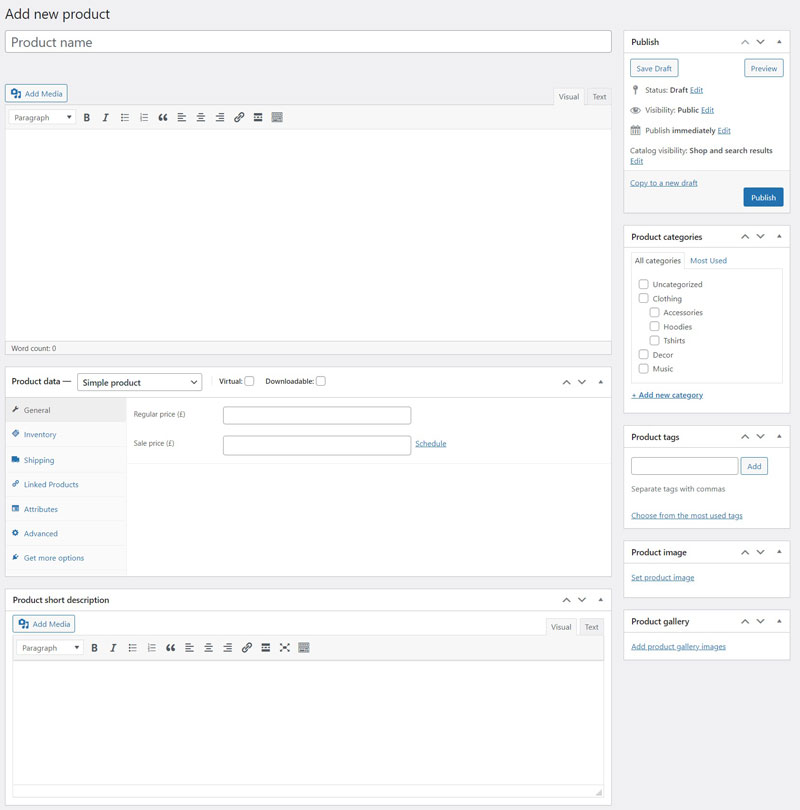
The image above shows the standard add new product page in WooCommerce (you can rearrange the sections if you wish) and there are multiple sections, which are covered below:
- Product Title – this is the name of your product, this will also be used to create the URL for your product page
- Main Description – sits underneath your product images, use this to give a detailed description of your product and include all relevant information
- Product Data – this is where you set up a lot of your products information such as pricing and inventory
- Short Description – sits next to your product images, for giving a brief description of your product
- Publish – this allows you to set the visibility of your product, you can also schedule products to go live at certain times
- Product Categories – choose which category your product should go in
- Product Tags – short descriptive labels for your products, can be used for descriptive, organizational and SEO purposes
- Product Image – your main product image
- Product Gallery – for any additional images of your product
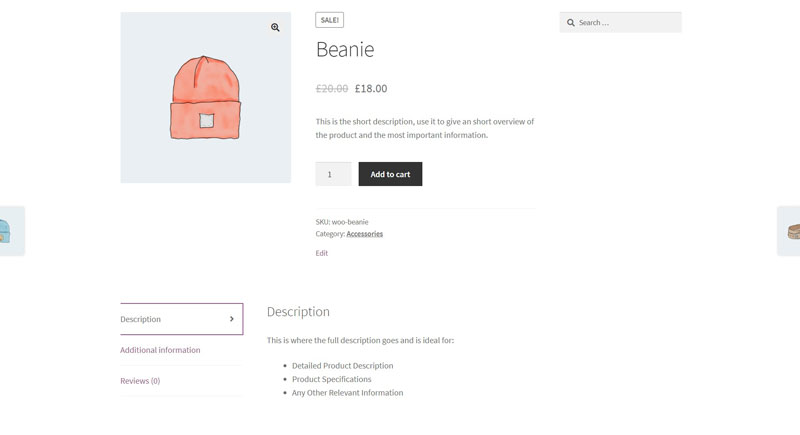
If you are unsure about how the two product descriptions look or work on your product page, then take a look at the image below.
We are going to go through all of the sections of the Product Data box as this is where you enter the important information for your product.
At the very top of the Product data box is where you select the product type from the dropdown menu and there are also checkboxes for Virtual and Downloadable products.
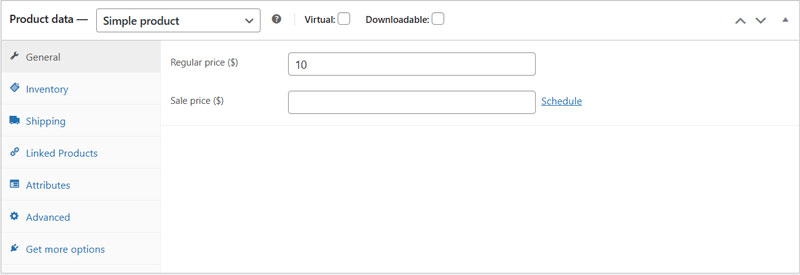
The first tabbed section is called General and this is where you enter your product prices and there are two boxes:
- Regular price – this is the normal sale price of the product
- Sale price – this is the price for the product when it is on sale and on the front end of your site, the regular price will be crossed out with the sale price next to it, you can also choose to schedule the sale price and clicking schedule will bring up a date from and date to box
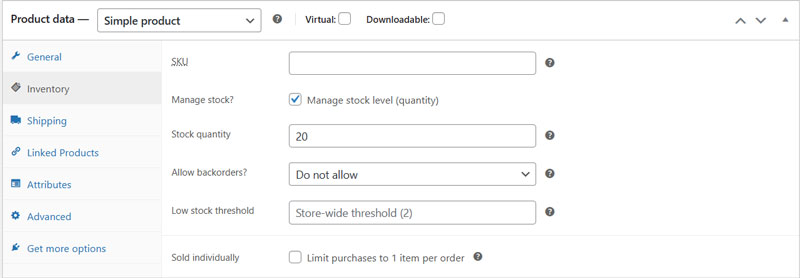
The second tab is for your inventory and there are a few different options in here:
- SKU – enter the SKU code for your product
- Manage stock – a checkbox for whether you want to manage the stock levels, which you will for physical products
- Stock quantity – enter the number of products you have in stock
- Allow backorders – select whether you do or don’t allow backorders on this product from the dropdown menu
- Low stock threshold – if you want to set a custom low stock threshold then enter it here otherwise it will use to store default
- Sold individually – a checkbox to limit purchases to 1 item per order
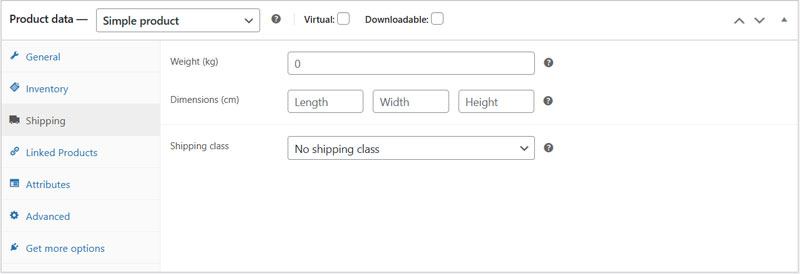
The third tab is Shipping and in here there are three options:
- Weight – enter the weight of the item (only needed if you are calculating shipping)
- Dimensions – enter the length, width and height of the product (only needed if you are calculating shipping)
- Shipping class – if this product uses one of the shipping classes you created, then select it from the dropdown menu
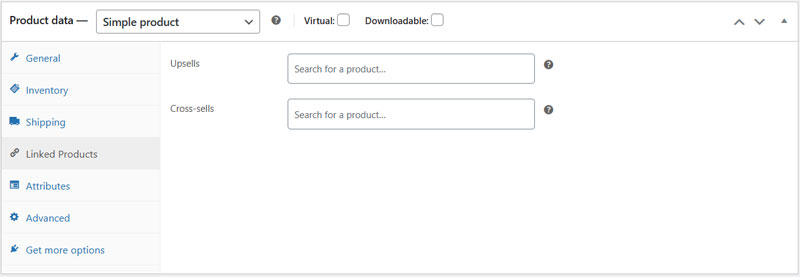
The fourth tab is for linked products and this has two sections:
- Upsells – this is for promoting products to sell instead of the listed product
- Cross-sells – this is for selling products related to the listed product, such as accessories
Using these effectively can lead to sales of more profitable products or higher-value baskets.
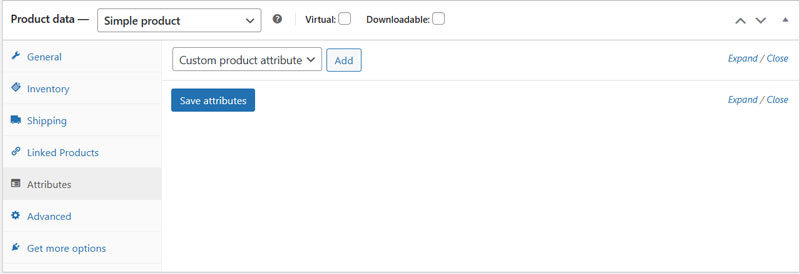
The next tab is for product attributes and adding these can help customers filter through your products and are also required for setting up variable products.
If you want to know how to set these up, we’ve covered this in the Variable Products section below.

The Advanced tab only contains a couple of options:
- Purchase note – this is for entering a note that is sent to the customer following a purchase
- Menu order – if you want to set up a custom menu order, then you enter which position in the menu you want this product to be
- Enable reviews – a checkbox to say whether or not you want reviews enabled on this product
The final tab is Get more options and this just links you to some plugins that you can install from WooCommerce that adds more options to the Product data section.
Grouped Products
The second type of product is Grouped Products and this allows you to advertise all of the products from a collection or range without the customer having to navigate to all the individual product pages.
For example, if you were selling a fashion set, you would create individual listings for all the different pieces (t-shirt, hoodie, beanie etc) and then create a grouped product, which includes all of these products, which you can list on your site and customers can choose which of the products they want to but from a single page, like in the image below:
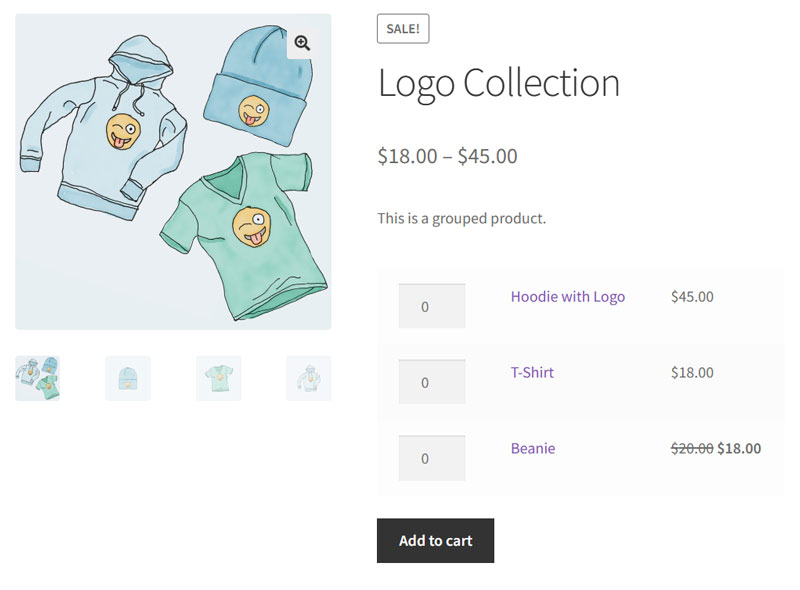
With the grouped product, all the pricing information is carried over from the individual product listings but this isn’t a product bundle, if you want to offer those, then you will need to install an additional plugin.
Setting up a grouped product is very simple, just add a new product and select grouped product from the dropdown menu in the product data section and you will see that a couple of the tabs will disappear but the most important option is found under the linked products tab.
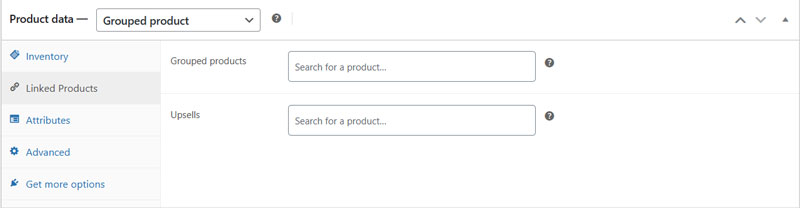
This is the Grouped product box and to start adding products to the group, simply start typing the name of the product and any products that include the letters/number you have typed will appear and just click on the one you want and repeat the process until all of the products have been added to the group.
You will still need to enter all of the product information, such as:
- Product name
- Short and long descriptions
- Featured and gallery images
- Category
As you would when setting up any new product on WooCommerce and when everything has been set up, click publish and the grouped product will be available on your storefront.
Variable Products
Creating a variable product is the more complicated of the three as you need to create Attributes before you can add variations to your product listing and there are three main steps to this:
Step 1: Set Up Product Attributes
The first step in creating product variations is to set up product attributes as these are going to be what you build your variations from.
To do this, go to Products → Attributes in your WordPress dashboard and you will be presented with the following page:
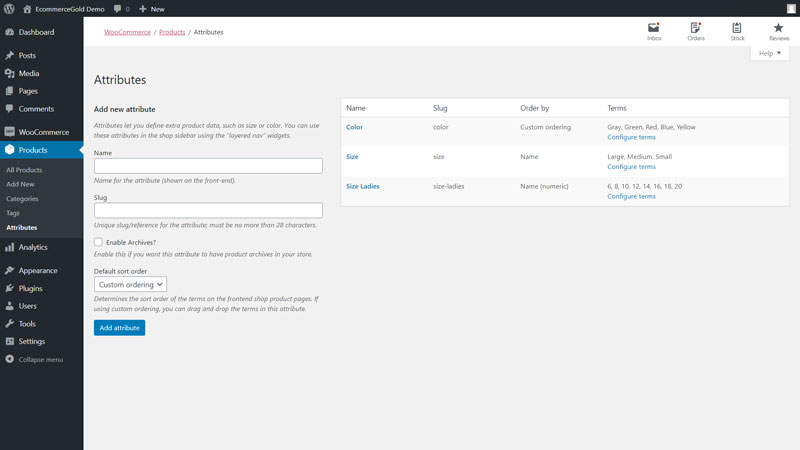
When you are creating a new attribute, enter the name you want for that attribute and the way the terms within the attribute are sorted. There are four options but the main three are:
- Custom Ordering – You choose the order in which the terms are displayed (Colors in above image)
- Name – Alphabetic sorting based on the names you give to the terms (Size in above image)
- Name (Numeric) – Numeric sorting, should be used for any numbered terms (Size Ladies in above image)
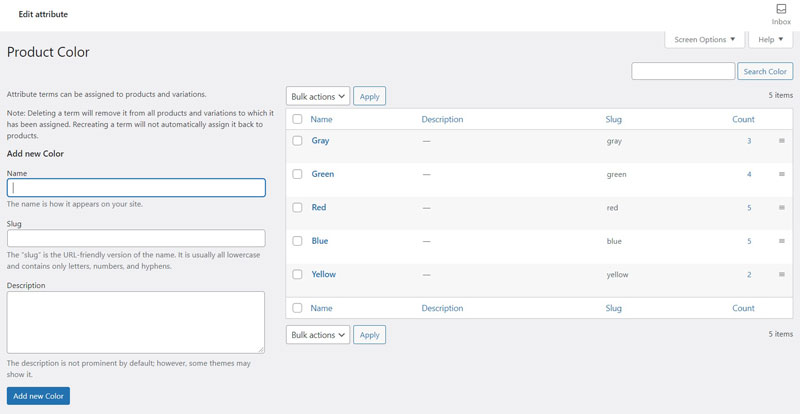
Once you have created the attributes, you need to set up the options, or terms within the attribute and that is done by clicking the configure terms link and on this page, you can set up all the options you need for the product.
These attributes can also be used to help customers search through your products if you use the Filter by Attribute widget that can be added to your sidebar and/or footer.
Step 2: Create or Edit a Product
Once you have set up all of your product attributes, you can then start to set up your product variations. This is done by selecting Variable Product instead of Simple Product from the dropdown menu in the Product Data section of the add new product page.

When you select variable product, the Inventory tab in the Product Data section will be replaced by a Variations tab. To begin setting up your variations, you first need to select which attributes you want to apply to that product.
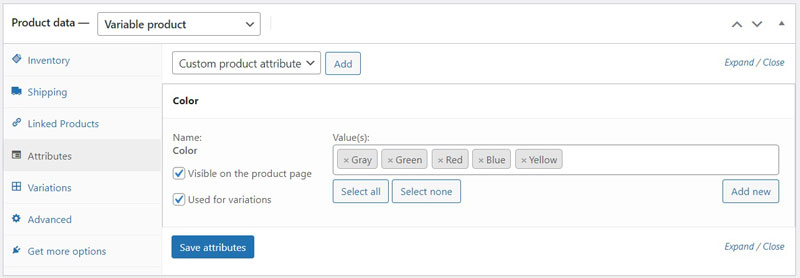
Once you have selected the attribute and options you want to use in your variation, you much make sure that the Used for Variations check box is ticked. Once you have done this and selected all of the attributes you want to use, click Save attributes and then move to the Variations tab to begin setting them up.
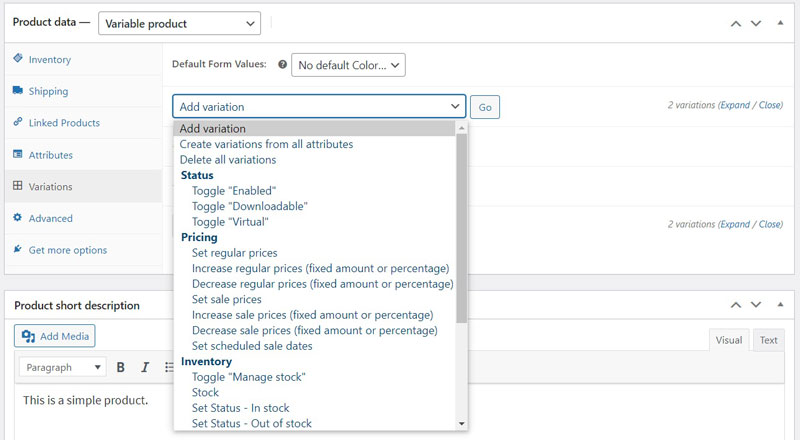
There are a couple of different ways you can create variations for your product, the first is select Add Variation from the dropdown menu and click go, you can then select which attribute you want to create a variation for.
The second is to select Create Variations from all Attributes and click go, this will automatically create product variations based on the attributes that you selected earlier, this is a good way to bulk-create variations.
There are also more options available in the dropdown menu but the first two will be the best option for most.
Once your product variations have been created, hover your cursor over the variation and three pop-up options will appear:
- 3 Bars, this will allow you to drag and reorganize your variations
- Arrow, clicking the arrow opens up all of the options for the product variation
- Remove, clicking this will ask you if you are sure you want to remove the variation
For this tutorial, we are going to be clicking the arrow, so that we can edit all the options for this variation.

In this dropdown menu is where you set up all of the information for that variation and this includes:
- Variation Image
- SKU Code
- Whether the product is Enabled, Virtual or Downloadable
- If you want to manage stock levels (adds additional boxes)
- Price & Sale Price
- Stock Status
- Weight & Dimensions for Shipping
- Shipping Class
- Description for the Variation
Once you have worked through this section, click save so that you don’t lose any of this information, then do the same with all of your other product variations.
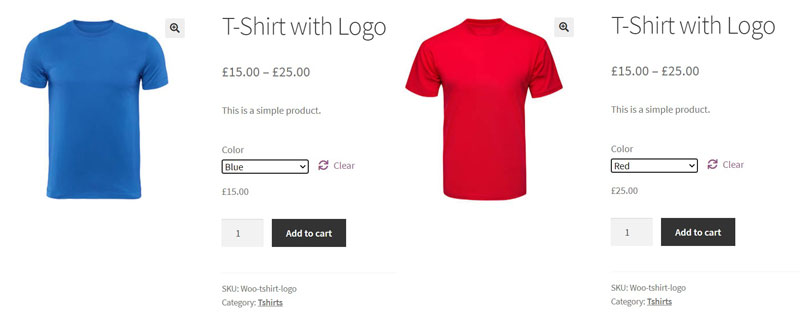
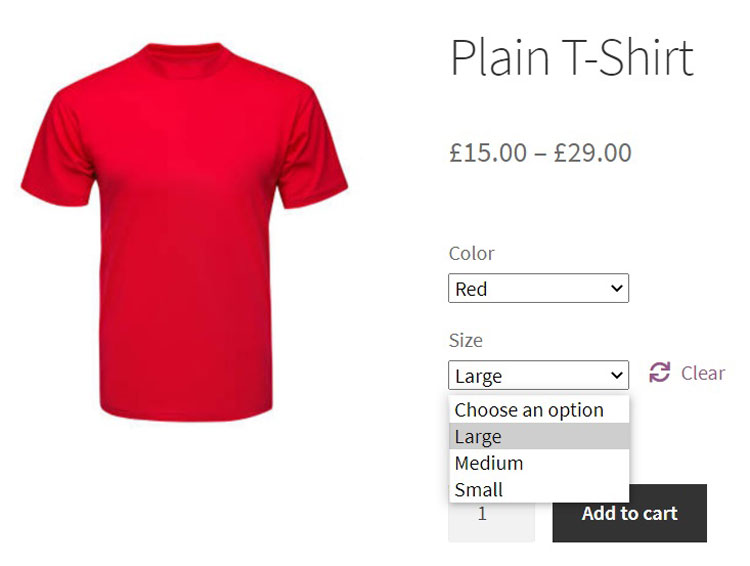
You can then preview how these product variations appear on the front end of your site and as you can see in the image below, as the dropdown box has been added with all of the product variations that you created.
If your variations are priced differently, it will also add the price range for the products as well.
Step 3: Multiple Variations
It may be the case that you need to create multiple variations for your product and using the example above, this could be adding size alongside the colors.
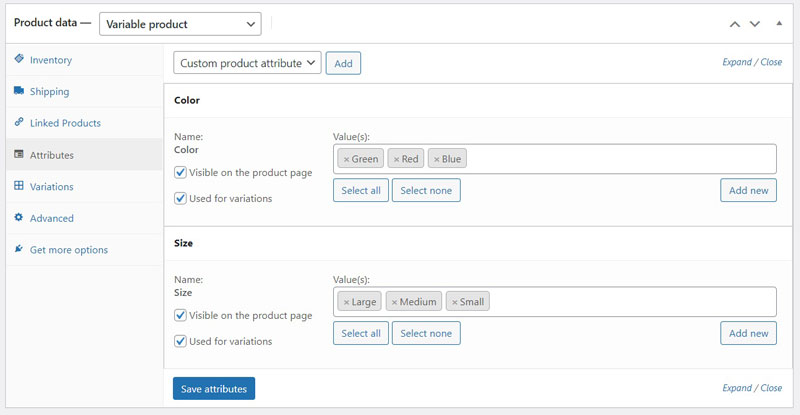
The process is basically the same except that you add multiple attributes in the Attributes tab.
Then when it comes to adding the variations, you will be able to add information for each type of variation, as can be seen in the image below, I could create different prices etc for each color t-shirt and size combination.
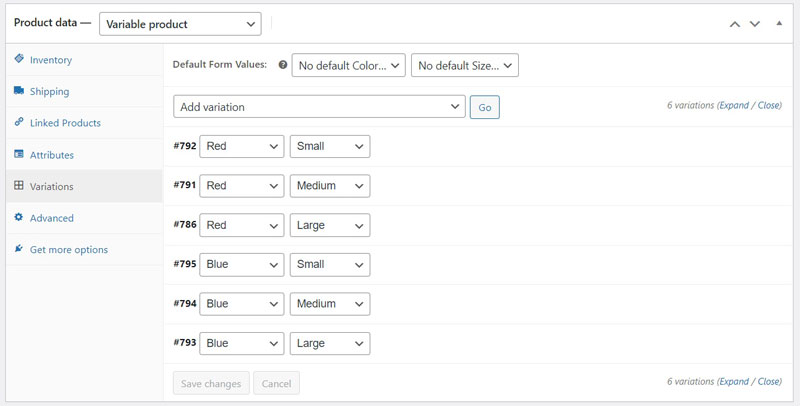
Multiple variations do take longer to set up as there are more options to configure but for some products this is essential and on the front end of your site, there will now be two different dropdown boxes that customers can choose options from.
Customers also won’t be able to add products to their baskets unless they select an option from both dropdown menus.
Step 6: Add WooCommerce to Your Storefront
Now that you have everything ready to go, it is time to add WooCommerce to the front end of your WordPress site so that you can actually start selling products.
There are multiple ways to add WooCommerce to your storefront but some of the options may depend on the theme you are using, so we aren’t going to go into too much detail but some of things you can do include:
- Adding links to your WooCommerce pages, categories etc in your navigation menus
- Adding links in your page footer
- Adding WooCommerce blocks to existing pages or blog posts
- Creating a custom homepage using WooCommerce blocks
But when you are adding WooCommerce to your storefront, you want it to be as easy as possible for customers to navigate around your site and also find all of the important pages as this is going to lead to more sales and increased conversion rates.
Step 7: Testing and Going Live
Before you take your WooCommerce store live, you want to test it thoroughly first to make sure that everything is working properly, so you want to:
- Run test orders – this allows you to check that your checkout, payment gateway and email notifications are all working
- Update order statuses – once again to make sure that email notifications are working
- Refund and cancel orders – so that you know that the process works and customers will get their money back
Once you are happy with it, then get friends or family to go through the checkout procedure and see if they run into any problems. It is always better to do this than trying to sort out problems with actual paying customers.
You are now ready to go live and depending on how you have your site set up, this could be a simple as switching off maintenance mode (usually an option in your security plugin) or switching your payment gateway from testing to live.
Conclusion
So that is how you set up the core WooCommerce plugin for physical products and we think we covered pretty much everything from installing and settings up the plugin to creating your products and getting ready to go live.
For physical products, you may have noticed that we didn’t cover anything about order management and that is because the only thing you can do with the core WooCommerce plugin is update the order status, if you want to print your WooCommerce orders or export them, you will need an additional plugin and we’ve linked to our guides on both of those.
With additional plugins, there is basically no limit as to what you can do with WooCommerce but having a good understanding of the core features of the plugin makes everything else a lot easier and we hope this guide has been helpful in getting you started with your WooCommerce journey.

Hi, I'm Paul, the Owner and Founder of EcommerceGold.
I ran my own Ecommerce Business for over 7 years and now help others start their own online retail empires!