WooCommerce Review (2026) – The Best WordPress Ecommerce Plugin?
Is WooCommerce any good? It’s ok and is worth considering if you are already running a WordPress website and looking to add an online store to it but for building an ecommerce website from scratch, we think there are better options out there because:
- WooCommerce has a larger learning curve than hosted platforms such as Shopify
- Keeping WooCommerce updated, secure and optimized can be challenging
- It requires a number of additional plugins to have the same features other platforms have as standard
The area where WooCommerce does perform well is in terms of flexibility as it can be used as a base for a number of different types of ecommerce store but if you are selling physical products, there are better options out there.
3.6/5
EcommerceGold Score
EcommerceGold is reader supported and we may earn a commission from products or services purchased through links on our site at no additional cost to you, to learn more please see our affiliate disclosure.
WooCommerce Pricing
Both WordPress and the WooCommerce plugin are completely free to install and use BUT running a Woo store isn’t free, this is because you need hosting in order to be able to use this combination and this isn’t free!
Now ideally, you should be looking at hosting that is PCI compliant as this is what ecommerce websites should be run on but when you are just starting out, you will probably be ok using a pretty basic hosting package that should cost around $5-$10 a month.
But for PCI-compliant hosting, pricing starts from around $20-$30 a month and goes up to a few hundred dollars a month, depending on your traffic and storage requirements.
Hosting costs are something that you should take a serious look at before choosing WooCommerce as while the costs may be lower than hosted platforms initially, you may end up spending the same or more on good quality, PCI-compliant hosting as you would for a monthly subscription to a hosted ecommerce platform.
WooCommerce Features
As standard, WooCommerce is very basic when it comes to features as the plugin is designed to add a basic shopping cart to a WordPress site, which can then be customized with the addition of additional plugins but as standard, you get the following features:
Ecommerce Tools
- Sell Physical & Digital Products
- Discount Coupons
Marketing & SEO
- Blog (WordPress)
- SEO Friendly URLs
Reporting
- Sales by:
- Date
- Product
- Category
- Registered vs Guest Customers
Payment Gateways
- PayPal Standard
- WooCommerce Payments (plugin)
- PayPal Express (plugin)
- Amazon Pay (plugin)
As you can see, you really don’t get a lot in terms of features and without additional plugins or using third-party software, it is only really good for digital products as standard as it is missing some key features for selling physical products, which is covered in more detail later in the review.
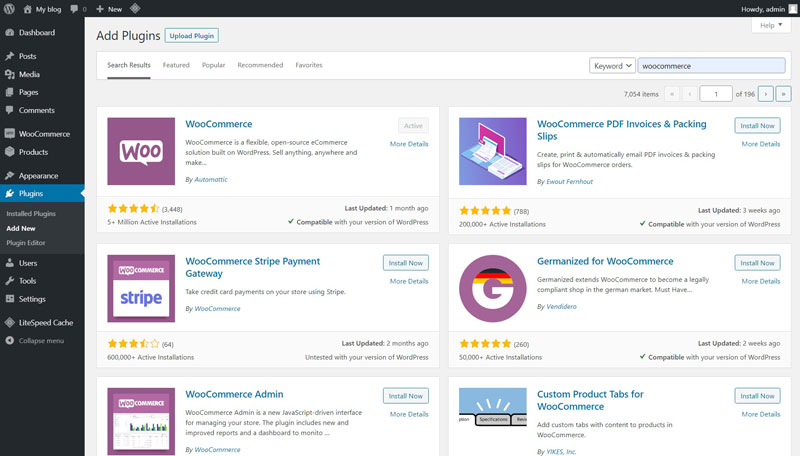
WordPress Plugin Library
Now while WooCommerce isn’t great as standard, features and functionality can easily be added with plugins and that is where the WordPress plugin library becomes a very useful resource as it contains over 1,000 results for the search term WooCommerce.
And these plugins cover a variety of different categories from ecommerce features to marketing and payment gateways and as a bonus, every plugin in there is free to use.
But there is a but to this and that is that while all of these plugins are free, they may not contain all the features you need, as many plugin developers offer a free plugin to allow you to basically test the plugin but if you need all the features, you will need to upgrade to the paid one and costs can vary depending on the developer.
Payment Gateways
Payment Gateway options are very limited with WooCommerce, as you will have seen in the summary section above but a relatively recent addition to the standard offerings is WooCommerce payments, which allows users to accept credit and debit cards payments on their store.
What is great about this addition, is not only that it is free but it is powered by Stripe, which means it is built on very solid foundations. You can also accept Apple Pay and Google Pay through the WooCommerce Payments option.
But if you want to offer other payment options, such as PayPal Express Checkout or Amazon Pay, you will need to install additional plugins, which are free and for more ‘traditional’ payment gateway like Worldpay and Sagepay, then you will need to purchase the relevant plugin from WooCommerce and these cost from $79 for the year.
WooCommerce Theme Selection & Customization
This is definitely one of the WooCommerce trump cards as no other platform really comes close to the number of themes available, especially free themes!
There are over 1000 themes in the WordPress theme library that have WooCommerce integration and it wouldn’t be surprised of there are others in there that just haven’t mentioned it and many of the free themes also have premium or pro versions that include a lot more features.
If you want a premium theme then the selection is incredible, you can use marketplaces such as themeforest.net or go directly to developers and buy from them.
Theme customization with WooCommerce very much comes down to the theme that you are using for your store as some come with lots of options and some with very few. Main theme settings are available in the WordPress Customizer and this is where you set layout options, fonts and logos to name a few.

For your site pages, you need to build these outside of the customizer and for most new sites, you will be using the Gutenberg Page Builder, which has a good selection of blocks and there are plenty of block plugins that allow users to make very good looking pages and as it is a live builder, you can see how these pages look before publishing them.
For customizing your menus, sidebars and footers, you need to also do these outside of the customizer by using the menu or widgets sections within the dashboard.
WooCommerce Support
With WooCommerce, you don’t get any support from the team behind the plugin but there are various support you can get for different parts of your site, including:
- Support from your web host
- Support from plugin or theme developers (usually only for paid ones)
But they will usually only give support on their specific things, you won’t have general support unless you employ the services of a developer, which obviously will be an additional cost.
Fortunately, there is lots of general information about WooCommerce due to its popularity and a quick search on Google or YouTube will generally return a result that should be able to answer your question.
WooCommerce Hosting
So we have already discussed hosting in terms of pricing but we do need to talk about this in a bit more detail as it is very important. this is because you not only need good hosting in terms of security but also performance as well.
And when it comes to performance, there are many variables that can impact how fast a WooCommerce site is, including:
- How fast the Hosting is
- How well the site is Optimized
- Quantity and quality of Plugins
- Which Theme you choose
It is for these reasons that performance testing for WooCommerce can’t be done as there are too many variables.
How Easy is WooCommerce to Use?
Ease of use is a hugely important thing to consider when choosing an ecommerce platform as you want something that not only offers all of the features you need but is also something that is easy to use as this will help in the day-to-day running of your ecommerce store and for ease of use, we will be looking at:
- Getting Started
- Inventory Management
- Managing Orders
Getting Started
How easy it is to get started with WooCommerce does come down to where you are starting from, if you already have a WordPress site, which you are looking to add ecommerce too, then Woo is pretty easy as it a case of simply installing the plugin.
However, if you are starting from scratch, the process is a bit more involved as you need to:
- Buy your hosting
- Change the DNS of your domain name so that it is pointing towards your hosting
- Install the SSL certificate for your site
- Install WordPress and make sure it is on the https protocol
- Install the WooCommerce plugin
How easy this is to do, will in many cases come down to the hosting provider that you are using as some will do much of the process for you but others will leave you to do everything yourself.
Installing the actual WooCommerce plugin is straightforward, simply go to the WordPress plugin directory, search for WooCommerce, click install then activate once it has been installed.
You will then be greeted by the WooCommerce setup wizard, which takes you through the following steps:
- Store Details
- Industry
- Product Types
- Business Details
- Theme
Once you have been through this guide (you can choose to skip if you wish), there will be a list of prompts in your WooCommerce inbox, that includes adding a new product, configuring payment gateways, setting up shipping and taxes etc.

This gives you a solid base of knowledge around how WooCommerce works and also gets you to set up most of the important elements of a Woo store.
In terms of the dashboard itself, it is very simple and easy to use as the WooCommerce options are added to the main WordPress navigation menu, which are:
- The main WooCommerce heading
- Products
- Payments (only if you install the WooCommerce payments plugin)
- Analytics
- Marketing

One thing that was noted with our demo store, was that there was a delay when loading the Home or Analytics pages within WooCommerce but overall, the WordPress and WooCommerce dashboards are easy to navigate with well-labelled headings.
Inventory Management
When we are looking at inventory management, we look at 3 main elements:
- Creating a new product
- Organizing your inventory
- Managing your inventory
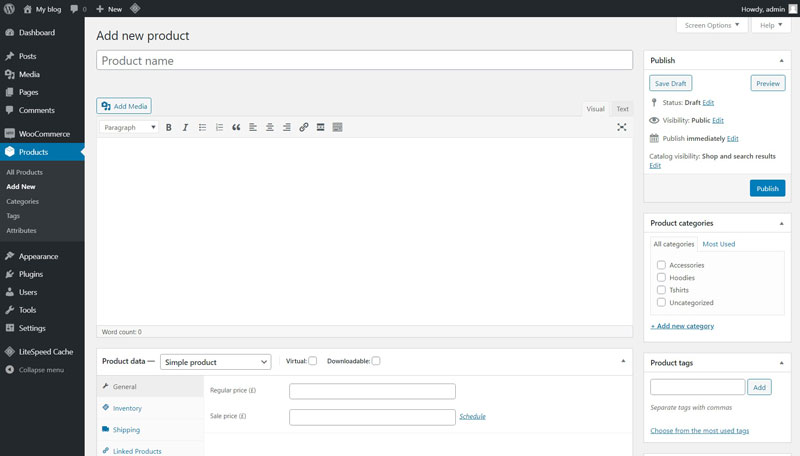
So, the first one is creating a new product and this is very easy to do as everything is on one page but the design is based on the classic WordPress editor and is starting to feel a bit dated but it is a case of function over form.
One thing that you do need to be careful of is the product descriptions as WooCommerce has two, the main description, which sits below the product images and the short description, which sites next to the product images and above the product information, so make sure you fill out the correct one.
The most complicated part of the add new product page is the product data section as this includes options for:
- Type of product, such as simple, variable or external/affiliate product along with whether it is physical, virtual or downloadable
- Pricing
- Inventory such as stock quantity and whether you want to track stock levels
- Shipping
- Attributes such as product options or variations
It just takes a little bit of time to work through all of these sections to make sure that your product listing is filled in correctly.
Organizing your products is very simple as WooCommerce uses a traditional category structure, that lets you create both parent and child categories, making it very easy to organize your products. You also have a lot of control over the layout of your menus, which allows you to make it easy for customers to navigate around your site
When it comes to managing your inventory, WooCommerce has made this very simple by having a bulk editor that makes it very easy to make changes to multiple products in one go or they have a quick editor that allows you to make changes quickly to individual products.
Managing Orders
This is something that really isn’t very good out of the box and doesn’t really let you do all that much.
To remedy this you can install the WooCommerce PDF Invoices & Packing Slips plugin, which is free to use and allows you to print off packing slips and invoices, they can also be attached to order confirmation emails.
It also makes sure that the order numbers are sequential as WooCommerce in its standard form generates random order numbers, which almost makes this a must-have plugin.
Without the above-mentioned plugin, you can update order statuses either individually or in bulk, if you do install the PDF plugin, then you can also print of invoices or packing slips in bulk or individually.
Why WooCommerce hasn’t bought the PDF plugin from the developer and integrated it with the core WooCommerce plugin is beyond me as it just adds the finishing touches it!
Conclusion
WooCommerce
Is WooCommerce Any Good?
WooCommerce is ok and definitely worth considering if you are already using a WordPress site for your business but for a brand-new site, there are better ecommerce options out there that offer much more functionality out of the box and are easier to run on a day-to-day basis.
This is because WooCommerce can be a headache from a technical perspective as updates and maintenance can cause problems, it also is not the most reliable platform, which is why anyone who is new to building websites, hosted platforms such as Shopify, offer a much better all-around option, that are also much easier to manage.
WooCommerce Pros:
WooCommerce Cons:
WooCommerce Alternatives


Hi, I'm Paul, the Owner and Founder of EcommerceGold.
I ran my own Ecommerce Business for over 7 years and now help others start their own online retail empires!