How to Create a Collection on Shopify (Step by Step Tutorial)
One of the more confusing aspects of setting up a Shopify store is their collections system and if you are not sure whether to go for a manual or automated collection or aren’t even sure what the difference between them is, then you have come to the right place!
As we have created a complete step-by-step tutorial to not only show you how to set these up but also explain what the difference is, so that you have a greater understanding of how the system works, so that you can apply it to your own store.
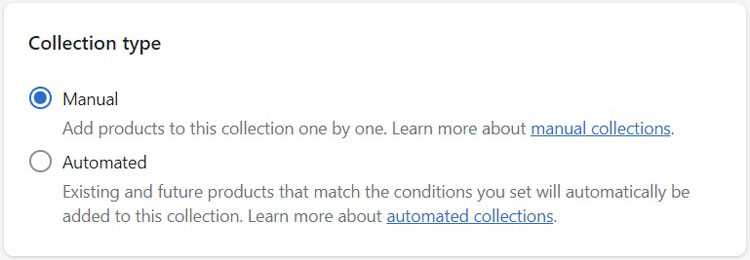
Manual vs Automated Collections
So the first thing to clear up is what is the difference between the two types of collections that Shopify offers and the short summary is:
- Manual Collections are collections that you create and then manually add your products to and this can be done via edit collections page or edit product page
- Automated Collections are collections that you create but rather than manually adding products, you create rules and any products to which these rules apply will be automatically added to the collection
There are pros and cons to both types of set up and we will leave you to decide which one is best for your online store.
Title and Description
The first step in setting up a Shopify collection (whether manual or automated) is to give it a title, this will be the pages H1 tag, so if you are going to be SEOing your store, then you want to make sure that this includes the main keyword for the page.
Adding a description is optional but once again, if SEO is part of your marketing strategy, then you want to add a description to your collection pages and as with most text boxes on Shopify, there are plenty of formatting options including:
Within the Shopify customizer, you can also choose to drag the description so that it sits below the product listings if you wish.

How to Set Up Manual Collections
As we said above, there are two options when it comes to creating collections and the first one is the manual collection
This is the simplest of the two collection types to create as you choose which products are included in the collection but there is a strange quirk when setting up a manual collection as you can’t add the products when you click on manual collection.
Instead, what you need to do is save the collection and the page will then refresh and the box below appears in place of the Collection type box as seen in the image above.
You can then begin manually adding products to your collection by either starting to type the name of the product in the search box and selecting it from the dropdown menu or you can click on the browse button and select them from the pop-up that appears, which shows all of your active products.

You can add multiple products in one go by marking the check box next to the products you want to add and then clicking the Done button in the pop-up and the chosen products will have been added to that collection.
You can also add products to a manual collection on the product creation/edit page.
This can be done using the Product Organization box, which is found on the right side of the product create/edit page and to manually add the product to the collection, either:
- Click on the Collections box and select the collection from the dropdown menu
- Start typing the name of the collection in the Collections box and select it from the search results that appear in the dropdown menu

How to Set Up Automated Collections
The second method is to create Automated collections and these have a bit of a steeper learning curve due to them being based on conditions that you create and you can create a lot!
For example, you can create conditions around:
- Product Title – this is if you want to create a collection around words that appear in numerous product titles such as rings or watches
- Product Type – if you entered a product type when creating your products, then you can use this as a way to put them into a collection
- Product Vendor – if you have items from specific vendors or brands and want to put them into their own collection
- Product Price – this is used if you want to group items together based on their price, for example products between $10 and $30
- Product Tag – if you created tags for your products, such as men’s ring or ladies’ watch, then you can create a collection around these tags
You also need to select whether the products that will be included in the collection match:
- All Conditions – this means that only products that match all of the conditions that you set will be included in the collection
- Any Condition – means that any product that matches any of the conditions you set will be included
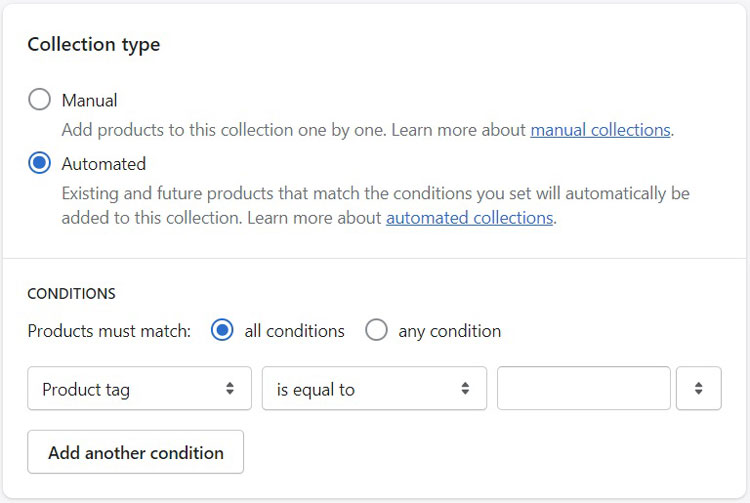
Once you have decided on what the collection is going to be based around, you then set the parameters for that rule, such as:
- is equal to
- is greater than
- is less than
- contains
You then type in the data that Shopify will use to select the products. Sorry if this sounds confusing but it is a bit of a challenge to put it into words but I will give you a couple of examples below to try and show you how it works.
Automated Collection Example 1:
The first example uses the Product Title condition, with the contains rule set to the word watch.
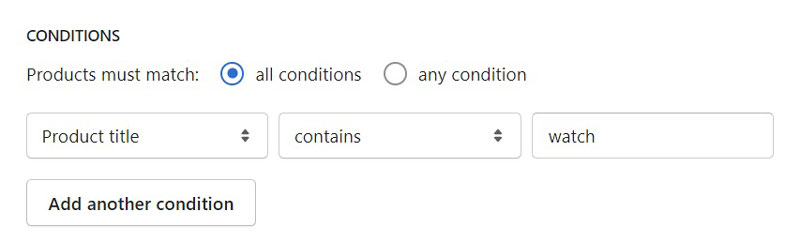
Shopify would put all of the products that contain the word watch in the title into that collection.
Automated Collection Example 2:
You can also create more than one rule for a collection and for this example, I am going to create a collection for Men’s Seiko Watches and it would look like this:

This then gives Shopify two conditions to work from when selecting the products to display in this collection and as it is set to all conditions, it means that all of the products in this collection would:
- Have the words Men’s Watch included in the title
- Have Seiko as the product vendor
This means that you can be quite specific in the products that you want to include in the collection and you can add multiple conditions, then once you save the collection, all eligible products will be automatically added to the collection along with any new products that you create, which also match these conditions.
Automated collections can be very useful when they are set up correctly but in order for them to work properly, also requires the right information to be added when creating a new product.
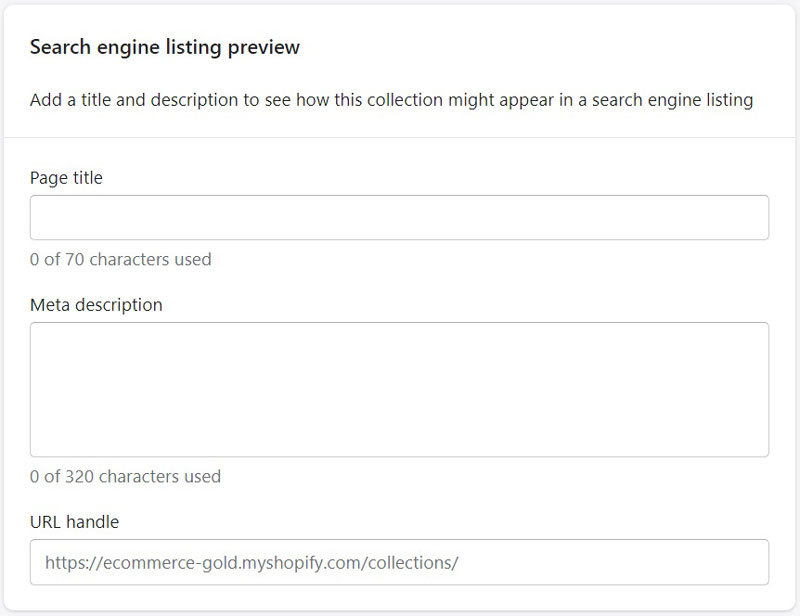
Collection SEO Settings
At the bottom of the create a new collection page is the SEO section, which includes three options:
- Page Title – this is if you want a different title to appear in search results that the title of the description you created at the start
- Description – this is the meta description for the page, which shows below the title in search results, if you don’t create a custom meta description, it will either be pulled from the description if one has been created or any other content that appears on the page if there is no description
- URL – this will be created from the title you entered at the start but if you want to change the URL, this is where you do it
Nothing that you enter in this section will appear on the front end of your site but will appear in search results.
Collections Availability
Next up is moving to the right sidebar on the collections page and the first section is the availability.
In this section, you choose which of your sales channels you would like this collection to be available.
If you don’t want to appear publically, then uncheck all boxes.

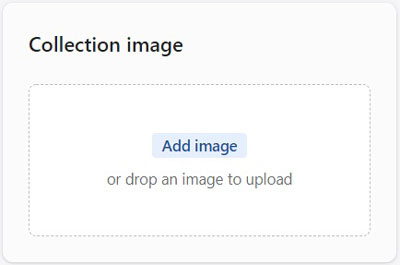
Add a Collection Image
The second box is to add an image to your collection, which is very useful for some sections that are available in the customizer.
Simply click add image and upload your chosen image, if you want to set an alt tag, either click on the image or an Edit option will appear and select the option to Edit image alt text.
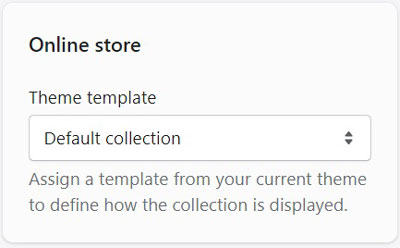
Select Collection Template
If you have created a custom collection template using the Shopify customizer, you can select the template from the dropdown menu.
As standard, Shopify uses the default collection template.
Subcollections
As this is a tutorial about collections, we need to talk about subcollections!
Shopify doesn’t allow for subcollections and it is one of the downsides of the Shopify system but there are a couple of workarounds that can be used to make it appear like your site does have subcollections.
The first of these is by creating nested menus in the main store navigation menu, the second is to create a page of collections, which can be linked to other pages or to collections.
Conclusion
Collections are an integral part of creating a Shopify store that is easy to use and navigate for your stores users and in this guide we have covered all of the standard options for creating both manual and automated collections.
And while manual collections are the easier option to set up, they can require more work in the long run due to having the manually add products to the collections, whereas automated collections have a steeper learning curve but can be easier to manage overall due to products automatically being added as long as they meet the criteria.
Just make sure that they have been set up correctly and the right information has been added to the product page.

Hi, I'm Paul, the Owner and Founder of EcommerceGold.
I ran my own Ecommerce Business for over 7 years and now help others start their own online retail empires!